

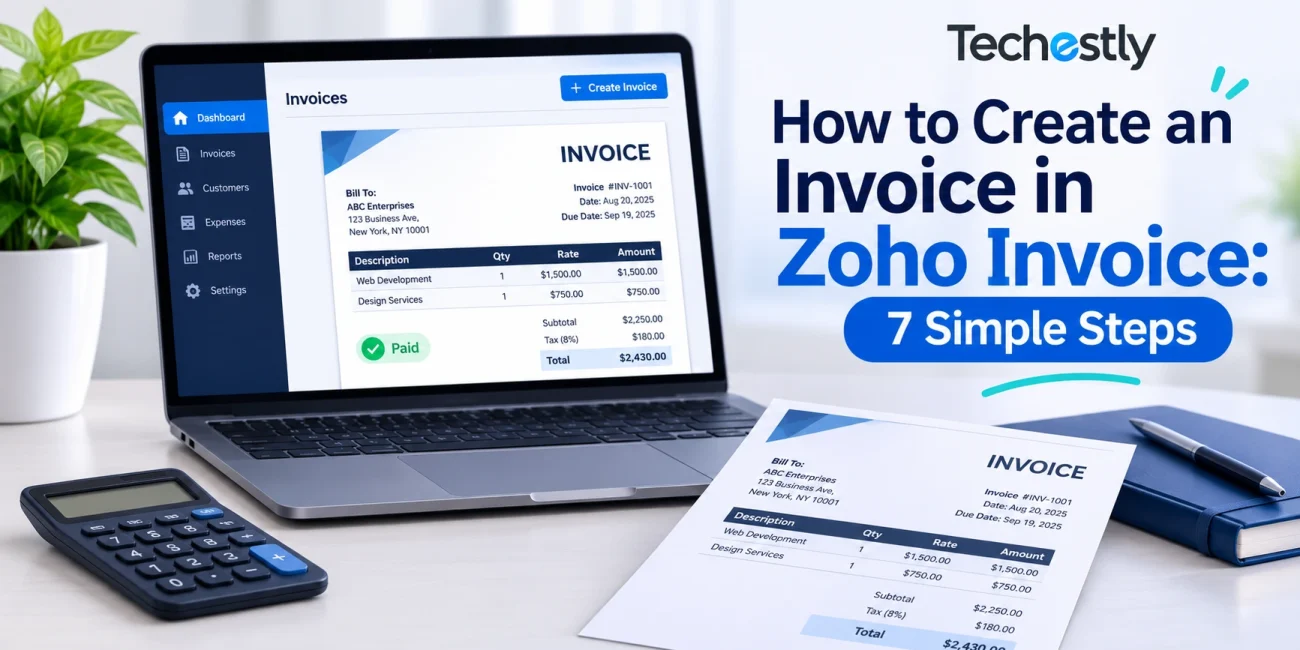
Zoho Invoice is a free invoicing tool for freelancers, consultants, and small businesses. You can use it to save customers and services, create professional invoices, send them by email, record payments, and remind customers about overdue balances, all without a monthly subscription.
We tested every step in this guide on a new Zoho Invoice account. Going from sign-up to a paid invoice took us about 15 minutes.
This guide walks through the full process in seven steps: creating an account, setting up your invoice design, adding a customer, adding an item, creating an invoice, sending it, and recording the payment.
If you are still comparing invoicing tools, start with our guide to the 7 Best Free Invoicing Software for Small Businesses.
How we tested: We created a free Zoho Invoice account on November 19, 2026, using a test organization based in Pakistan with PKR as the currency. We added a sample customer and service, created an invoice, and recorded a payment. All screenshots come from that test account, with personal details removed. Menu labels, tax options, and payment gateways can differ by country and Zoho edition.
What You Need Before Starting
Keep these details ready so you can finish the setup in one sitting:
- An email address for your Zoho account
- Your business name, address, and phone number
- Your logo as an image file (JPG, PNG, BMP, or GIF, up to 1 MB)
- Your tax registration details and tax rates, if you charge tax
- Your customer’s name, email address, and billing address
- The products or services you plan to invoice, with prices
- Your bank details, or a payment gateway account if you want online payments
You do not need a payment gateway to create an invoice. You can add bank details to the invoice and record bank transfers or cash payments yourself.
Step 1: Create Your Free Zoho Invoice Account
- Go to the official Zoho Invoice website.
- Click Sign Up For Free.
- Enter your email address and create a password, or sign in with an existing Zoho account.
- On the Organization Setup screen, enter your organization name and industry.
- Select your country, state or province, currency, language, and time zone.
- Click Get Started to open your dashboard.
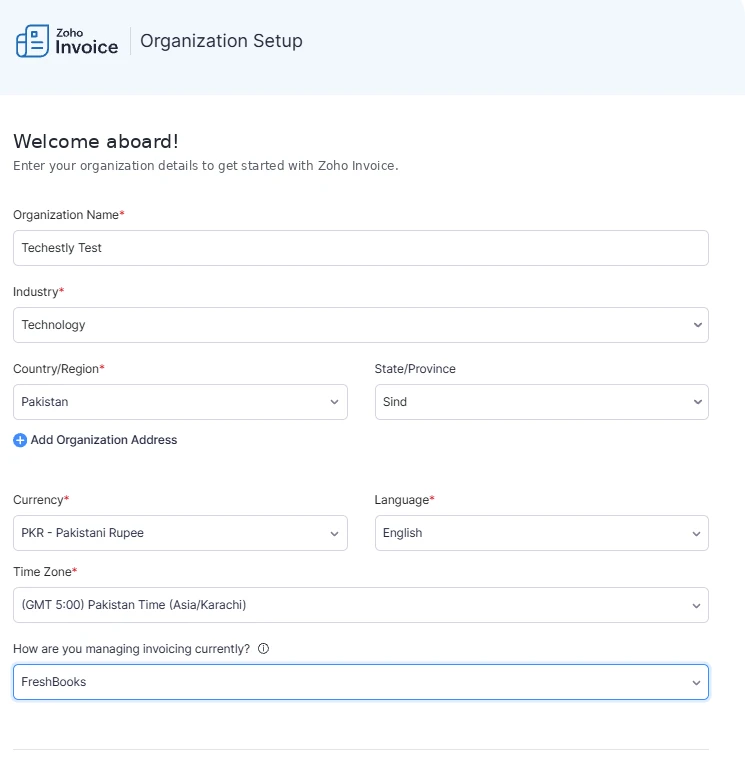
In our test, this took about two minutes. Zoho asked for everything on a single screen, and it also asked how we currently manage invoicing.
Choose Your Country and Currency Carefully
Your country decides which tax settings, payment gateways, and date formats you see later. Zoho also restricts changes to the base currency once you have recorded transactions. Confirm both before you create your first invoice.
Step 2: Choose a Template and Add Your Logo
After sign-up, Zoho opens a short three-step setup guide on the Home screen. The first step covers how your invoices will look.
- Pick an invoice template: Standard, Spreadsheet, Continental, or Compact.
- Under Organization Logo, click Upload and add your logo.
- Set the background, label, and font colors under Invoice Colors.
- Click Save & Proceed.
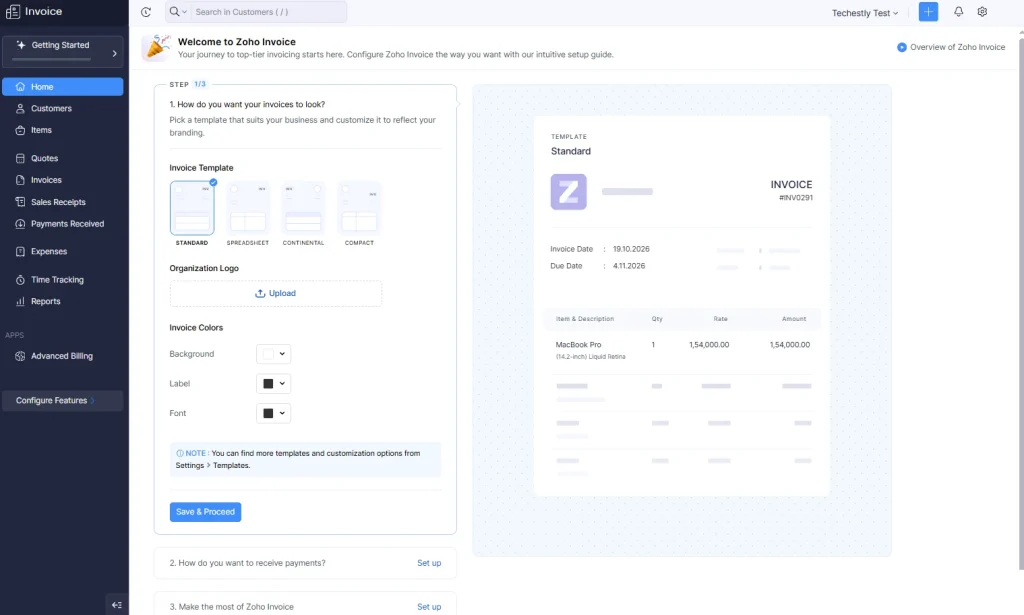
The preview on the right updates as you change the template, so you can see the result before saving. We kept the Standard template, which gives a clean, simple layout.
Zoho recommends a logo of about 240 × 240 pixels with a file size under 1 MB. The logo then appears on every invoice PDF and invoice email.
Complete Your Organization Profile and Tax Settings
Click the Settings gear icon in the top-right corner, then open Organization Profile. Add your business address, phone number, website, and primary contact email. This information appears on your invoices.
If you charge tax, open the tax settings and add your tax rates and registration number. Tax rules depend on your location and what you sell, so confirm them before you issue tax invoices.
Step 3: Add a Customer
- Click Customers in the left sidebar.
- Click + New.
- Choose Business or Individual as the customer type.
- Enter the contact name, company name, and display name.
- Add the customer’s email address and phone number.
- Under Other Details, choose the payment terms and, if needed, a tax rate.
- Add the billing address in the Address tab.
- Click Save.
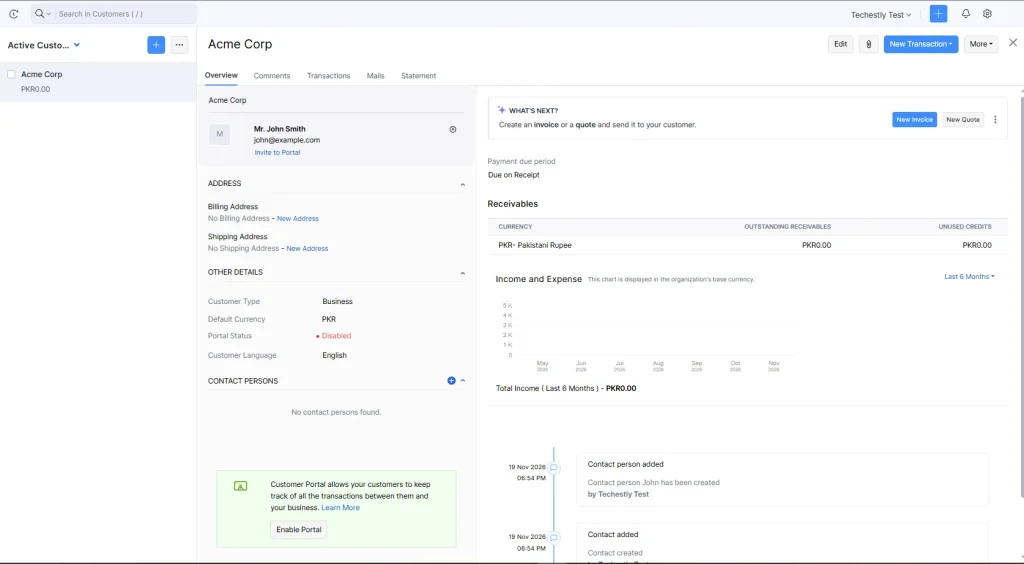
After saving, Zoho opens the customer’s profile, with receivables, an income chart, and a timeline of activity. A What’s Next? box offers a shortcut to create a new invoice or quote for that customer.
Check the email address carefully. Zoho sends invoices and payment reminders to it.
You can also add a customer while creating an invoice by choosing + New Customer in the Customer Name dropdown.
Step 4: Add Your Products or Services
Saved items let you add a product or service to an invoice without retyping its description and price.
- Click Items in the left sidebar.
- Click + New.
- Enter the item name.
- Choose Goods or Service as the type.
- Select a unit if needed, such as hours or pieces.
- Under Sales Information, enter the selling price and a short description.
- Select a tax if the item is taxable.
- Click Save.
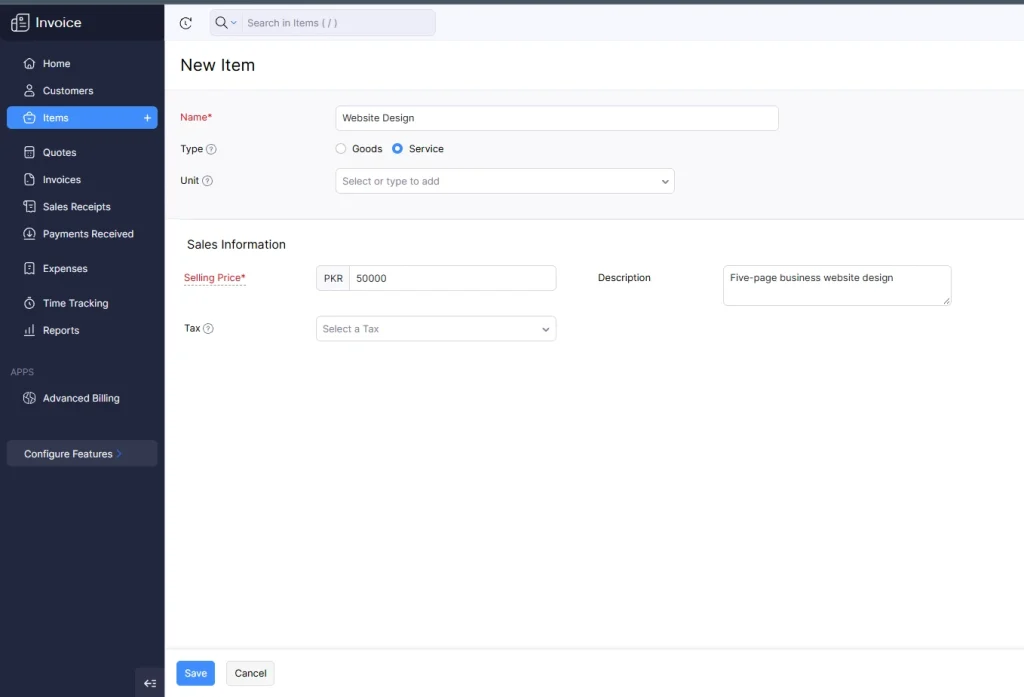
For our test, we added a service called “Website Design” priced at PKR 50,000. When we later picked it on the invoice, Zoho filled in the description and rate automatically.
You can also create an item from the invoice form using + Add New Item.
Step 5: Create Your First Invoice
- Click Invoices in the left sidebar, then + New.
- Select your customer from the Customer Name dropdown.
- Check the automatic Invoice#. Click the gear icon beside it to change the numbering.
- Set the Invoice Date and choose the payment Terms. Zoho fills in the Due Date for you.
- In the Item Table, select your item and enter the quantity.
- Select a tax if it applies.
- Add a message under Customer Notes, such as “Thanks for your business.”
- Add terms and conditions or a payment gateway if you need them.
- Check the total.
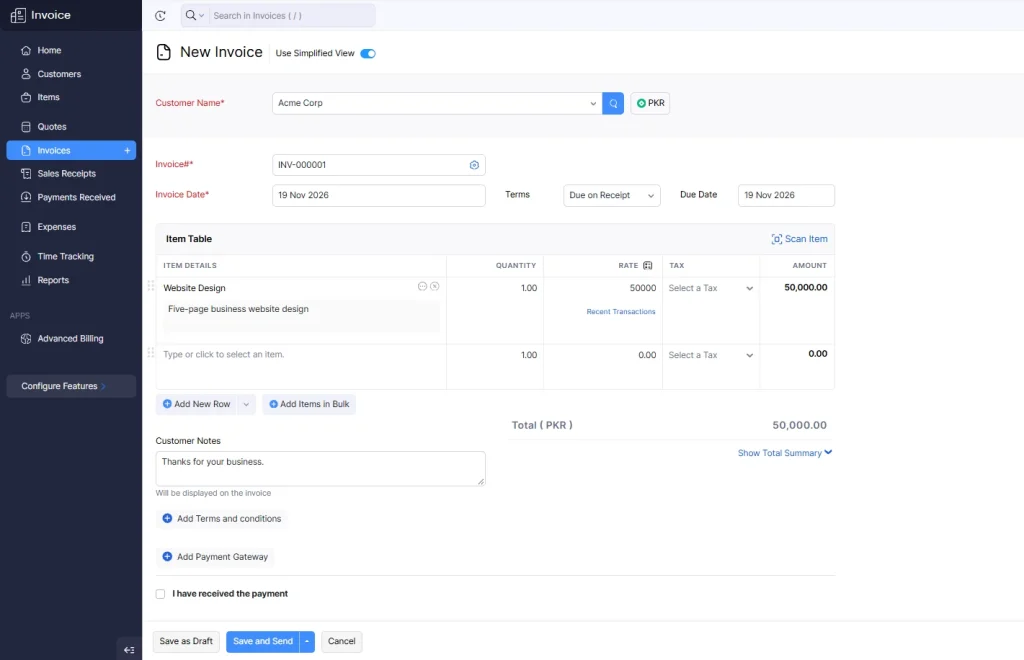
Zoho opened the invoice form in Simplified View in our test account. If you need extra fields such as Order Number, Discount, or file attachments, turn off the Use Simplified View toggle at the top of the page.
Payment Terms
| Payment Term | Meaning |
|---|---|
| Due on Receipt | Payment is due on the invoice date |
| Net 15 / 30 / 45 / 60 | Payment is due within that many days |
| Due end of the month | Payment is due by the end of the current month |
| Due end of next month | Payment is due by the end of the following month |
| Custom | You choose the due date |
If the Customer Has Already Paid
Tick I have received the payment at the bottom of the form. Zoho then saves the invoice as paid, so you do not need to record the payment separately.
More Design and Payment Options
Click Customize on the invoice to open more settings. You can switch the PDF template, add a QR code, show your bank details on the invoice, connect a payment gateway, and add custom fields.
Step 6: Review and Send the Invoice
The buttons at the bottom of the form give you several choices:
| Option | What It Does |
|---|---|
| Save as Draft | Saves the invoice without sending it |
| Save and Send | Saves the invoice and emails it to the customer |
| Save and Share | Saves the invoice and gives you a link to share |
| Save and Print | Saves the invoice and prepares it for printing |
| Save and Send later | Schedules the email for a later date and time |
For your first invoice, click Save as Draft and check the preview before sending.
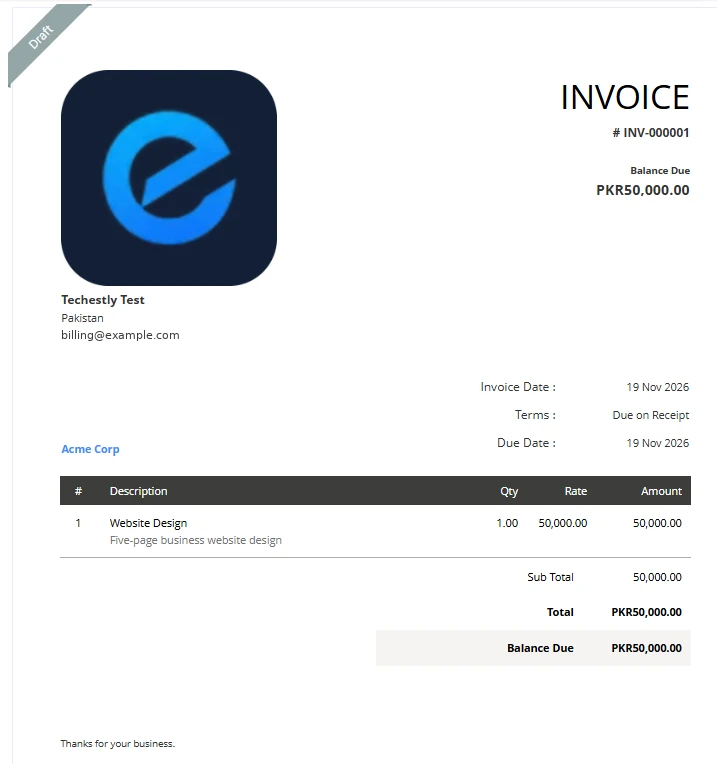
The preview showed our logo, business name, customer, due date, item, and balance due exactly as the customer would see them. A Draft label in the corner shows the invoice has not been sent yet.
When everything looks right, send it by email. If you deliver the invoice another way, such as WhatsApp or a printed copy, choose Mark as Sent instead. This changes the status to Sent without emailing the customer. We used this option because our test customer had a placeholder email address.
If you edit an invoice after sending it, send the updated copy so the customer has the correct version.
Step 7: Record the Payment and Send Reminders
Online Payments
Connect a supported payment gateway from the Customize menu or your settings. Available gateways depend on your country, and each gateway charges its own fees. Once connected, customers can pay from the invoice email or the customer portal, and Zoho marks the invoice as paid automatically.
Offline Payments
For cash, bank transfers, or cheques, record the payment yourself:
- Open the invoice and click Record Payment.
- Enter the Amount Received.
- Set the Payment Date and choose the Payment Mode, such as Cash or Bank Transfer.
- Add a reference number or note if needed.
- Untick Send a “Thank you” note if you do not want Zoho to email the customer.
- Click Save as Paid.
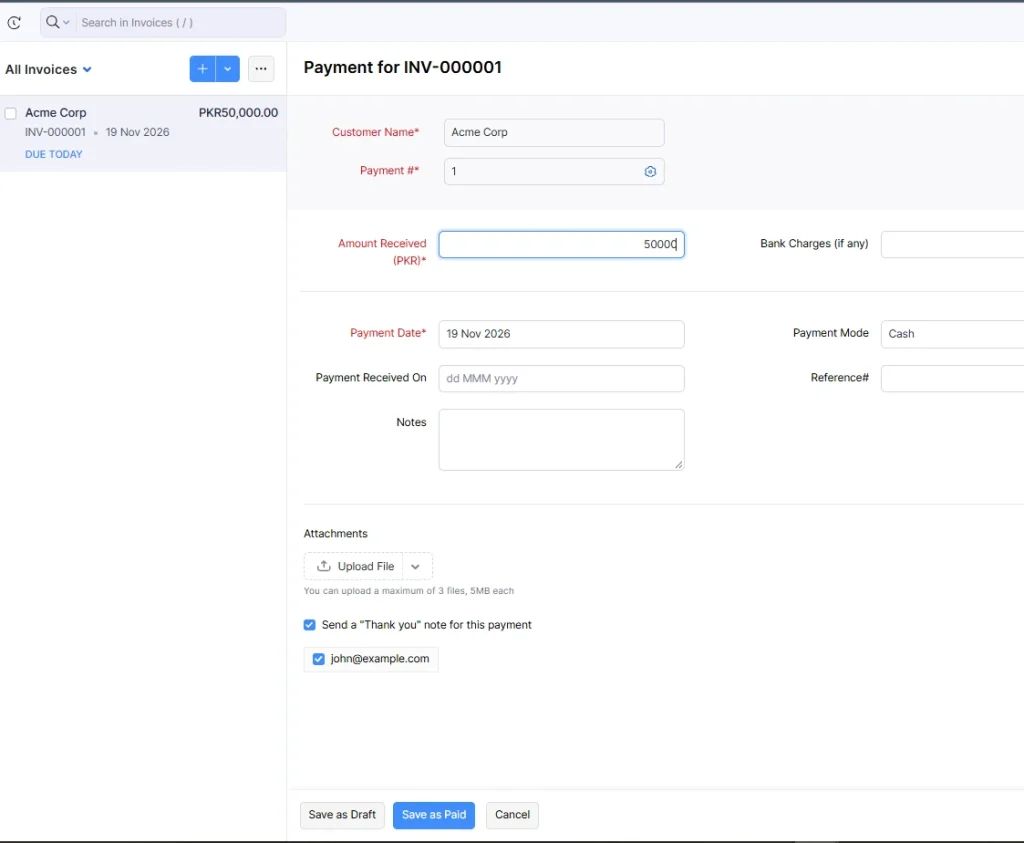
After we recorded the full PKR 50,000, the invoice changed to Paid and the balance due dropped to zero.
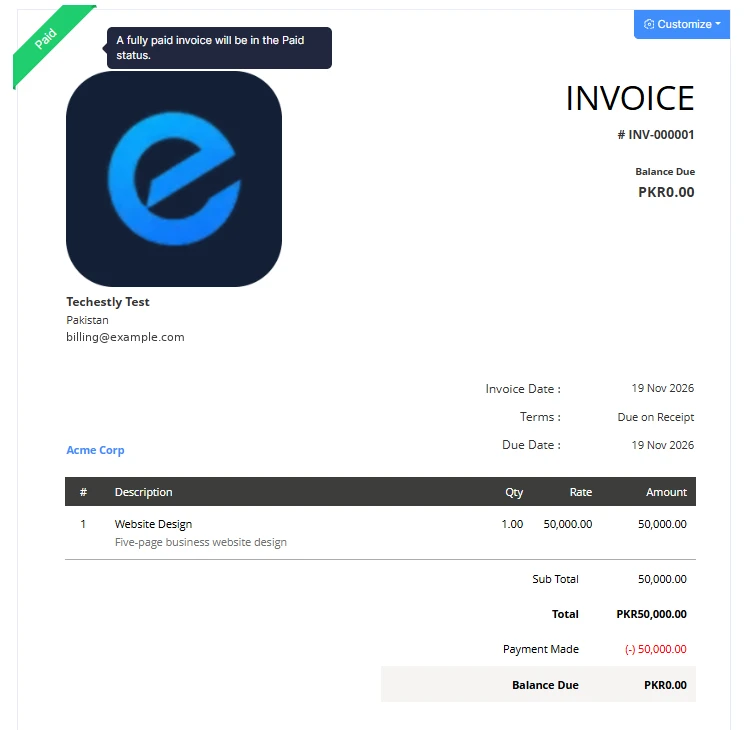
If the customer pays only part of the amount, the remaining balance stays on the invoice as outstanding.
Automatic Payment Reminders
- Open Settings and select Reminders.
- Turn on the reminders you want.
- Choose how many days before or after the due date each one is sent.
- Choose who receives it: you, the customer, or both.
- Edit the email message if needed, then save.
You can also send a reminder manually from any unpaid invoice.
Common Mistakes to Avoid
- Choosing the wrong currency at sign-up. It is hard to change once you have recorded transactions.
- Copying another business’s tax rate. Tax depends on your own location and registration.
- Sending without a preview. A wrong amount means a corrected invoice and a later payment.
- Leaving out payment details. Without a gateway or bank details, customers have to ask how to pay.
- Forgetting to record offline payments. The invoice will keep showing as unpaid, and the customer may get a reminder for money already paid.
- Reusing an invoice number. Each number must be unique.
- Editing a sent invoice without resending it. The customer keeps the old copy.
Zoho Invoice Free Plan Limits in 2026
Zoho Invoice is free with no time limit, but it caps usage:
| Feature | Free Plan Allowance |
|---|---|
| Monthly price | $0 |
| Users | Up to 2 |
| Projects | Up to 3 |
| Invoices | Up to 500 per year |
| Branding | Invoices show “Powered by Zoho Invoice” |
The yearly invoice count resets on the anniversary of your organization’s creation date, not on January 1. User and project limits do not reset. You can check your usage under Settings → Usage Stats, and Zoho notifies you when you reach 80% of a limit.
If you reach the invoice limit, existing records stay available, but you cannot create new invoices until the reset. Businesses that need more capacity are pointed to Zoho Billing, a separate paid product.
Zoho’s pricing FAQ also says data from accounts inactive for more than 180 days may be deleted after a notice. Sign in regularly and keep backups of your records.
Need a quick invoice without signing up? Try our free invoice generator and download a PDF in minutes.
Frequently Asked Questions
Is Zoho Invoice really free?
Yes. It is a free product with no trial period, but it limits invoices, users, and projects.
How many invoices can I create for free?
Up to 500 invoices per year. The count resets on your organization’s creation anniversary.
Can I create an invoice without adding a customer first?
Yes. Choose + New Customer from the Customer Name dropdown on the invoice form.
Can customers pay online?
Yes, if you connect a supported payment gateway. Availability depends on your country. Customers can also pay offline, and you record the payment manually.
Can I record a partial payment?
Yes. Enter an amount lower than the total when recording the payment. The rest stays outstanding.
Can I send an invoice without emailing it?
Yes. Choose Mark as Sent to change the status without sending an email, then share the PDF or link however you like.
Can I create recurring invoices?
Yes. Use Make Recurring on the invoice to send it automatically on a schedule, which suits retainers, maintenance, and subscriptions.
Does Zoho Invoice have a mobile app?
Yes. Zoho offers mobile apps for creating invoices, managing customers, and recording payments on the go.
Final Verdict: Is Zoho Invoice Worth Using?
In our test, Zoho Invoice took us from sign-up to a paid invoice in about 15 minutes. The setup guide, saved customers and items, and live invoice preview made the process easy to follow, even for a first-time user.
It suits freelancers and small businesses that send fewer than 500 invoices a year and have one or two people handling billing. The free plan includes recurring invoices, payment tracking, and reminders, which many free tools leave out.
The main drawbacks are the “Powered by Zoho Invoice” branding, the two-user limit, and the invoice cap. The Simplified View also hides some fields by default, which may confuse new users looking for discounts or order numbers.
Our recommendation: Start with Zoho Invoice if your business fits within the free limits. If you expect a larger team or high invoice volume, compare it with other options first.
Read our guide on how to choose business software for a small business, or compare Zoho Invoice with other tools in our Best Free Invoicing Software for Small Businesses guide.
Sources
- Hands-on test of a free Zoho Invoice account, November 19, 2026
- Zoho Invoice: Official Pricing and Free Plan
- Zoho Invoice Help: Creating an Invoice
- Zoho Invoice Help: Organization Profile
- Zoho Invoice Help: Items
- Zoho Invoice Help: Receiving Payments
- Zoho Invoice Help: Reminders
- Zoho Community: Understanding Your Zoho Invoice Limits
Last reviewed: November 19, 2026. Features, prices, and limits can change, so check Zoho’s current documentation before making a decision.er 19, 2026. Features, prices, and limits can change, so check Zoho’s current documentation before making a decision.

Other Articles
How to Set Up HubSpot Free CRM for a Small Business (7 Steps)
5 Best Free Password Managers for Small Teams in 2026