

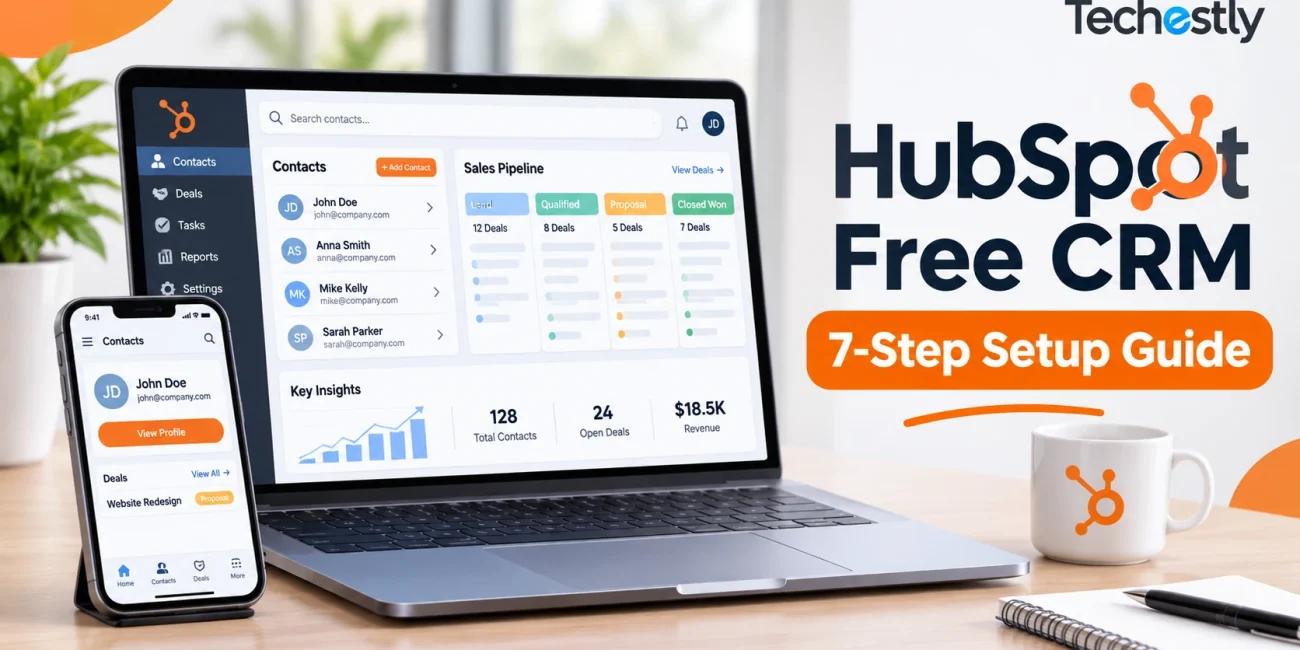
You can set up HubSpot’s free CRM for a small business in under an hour. By the end of this guide, you will have an account with your first contact, a deal pipeline that matches how you sell, and your first deal on a pipeline board.
We tested every step on a new HubSpot account. The biggest surprise was HubSpot’s new AI onboarding assistant, which built our custom fields, our deal stages, and a sales dashboard for us in about three minutes.
If you have not chosen a CRM yet, compare the options in our guide to the best free CRM software for small businesses, or see how HubSpot compares with Zoho in HubSpot vs Zoho CRM Free Plan.
How we tested: We created a free HubSpot account on November 19, 2026, completed the AI onboarding assistant, added a sample contact and deal, and checked the user limits in Settings. All screenshots come from that test account, with personal details removed. HubSpot changes its interface often, so some labels may differ in your account.
What You Need Before You Start
- A work email address, ideally on Gmail or Outlook
- Your company name, website, size, and industry
- Your existing contacts in a spreadsheet, with columns for first name, last name, email, phone, and company
- A rough list of the steps a customer goes through before buying from you
- The email address of one teammate, if someone else will use the CRM with you
Step 1: Create Your Free HubSpot Account
- Go to HubSpot’s website and click Get started free.
- Sign up with your email address, or with a Google or Microsoft account.
- On the Tell us about your company screen, enter your company name, website, company size, and industry.
- Click Create my account.
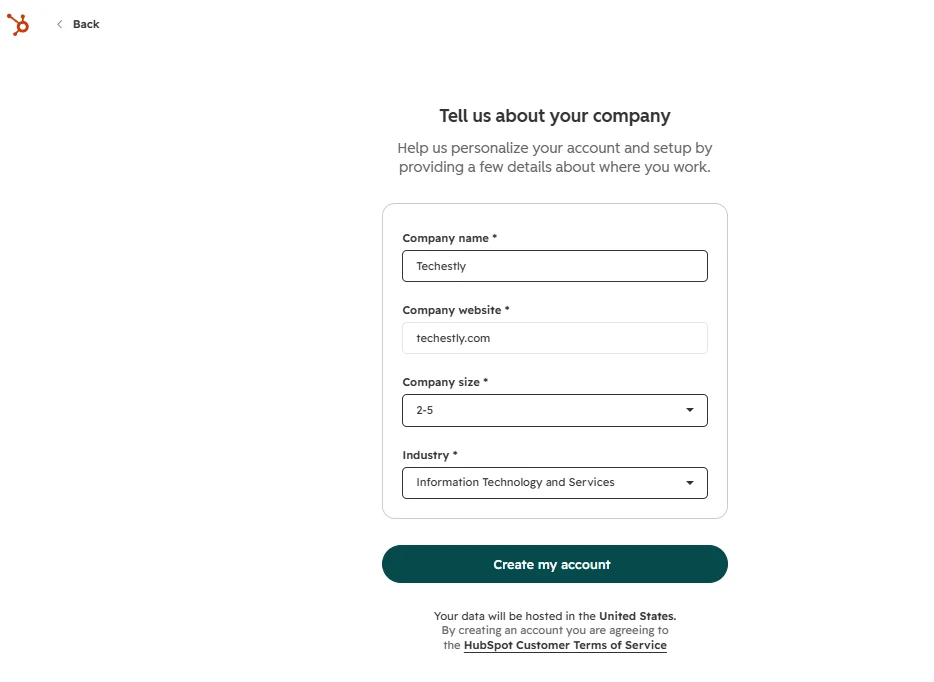
No credit card is needed. The screen also notes which region your data will be hosted in, which matters if your business has data residency rules.
Complete the AI Onboarding Assistant
After sign-up, HubSpot opens an Onboarding Assistant that sets up your workspace in six short steps. It reads your website and suggests a business description and target audience, then asks you to confirm them.
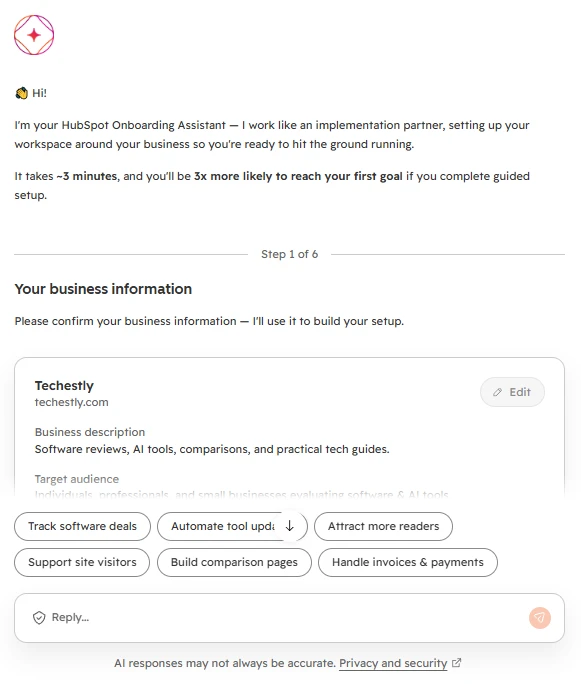
The six steps cover your business information, your first goal, the tools you use, your workspace fields, your deal pipeline, and your first dashboard. HubSpot says the guided setup takes about three minutes, and that matched our experience.
You can skip the assistant, but we recommend finishing it. It does much of the work in Steps 2 and 5 of this guide for you.
Step 2: Choose Your Goal and Workspace Fields
In the assistant’s second step, pick your main goal. We chose Track software deals, since this guide focuses on sales. Other options included attracting readers, supporting visitors, and handling invoices.
Based on that goal, HubSpot suggests custom fields for your contacts, companies, deals, and tickets.
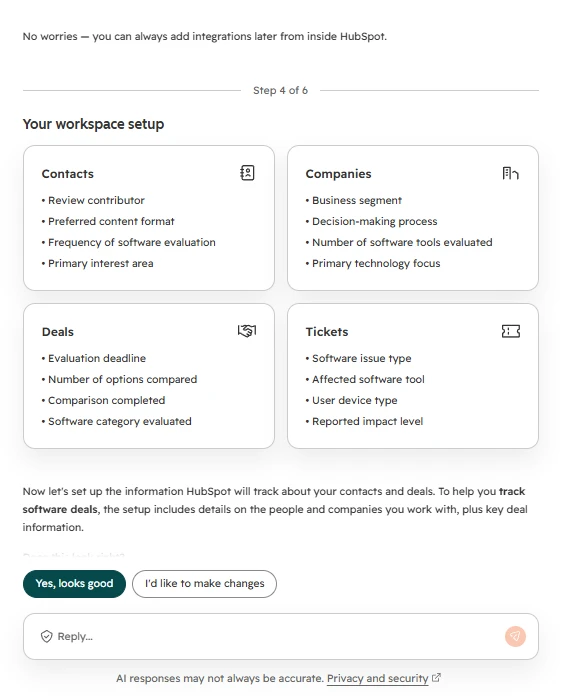
For our software review business, it suggested fields such as “Preferred content format” for contacts and “Number of options compared” for deals. Click Yes, looks good to accept them, or I’d like to make changes to edit the list.
The free plan limits how many custom properties you can create, so remove fields you do not need.
Check Your Account Defaults
After onboarding, click the Settings gear icon in the top navigation bar and open Account Defaults. Confirm your company name, time zone, and currency. The time zone controls when tasks fall due, and the currency is used for every deal amount.
Step 3: Connect Your Email and Calendar
In the assistant’s third step, HubSpot suggests tools to connect, such as Gmail, Google Calendar, Outlook, and its WordPress plugin.
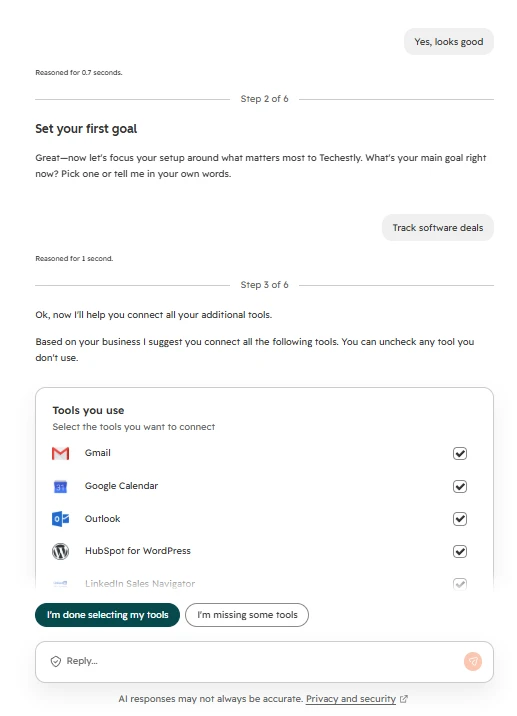
Connecting your inbox lets you send emails from HubSpot and saves those conversations on each contact’s record. Connecting your calendar lets you share a meeting link so contacts can book time with you.
Tick the tools you use and click I’m done selecting my tools. If you are only testing HubSpot, untick everything and connect your real inbox later from Settings. We left them unticked during our test to keep our own email out of the demo account.
If your team shares an address such as sales@yourcompany.com, connect it as a shared inbox instead of a personal one.
Step 4: Add or Import Your Contacts
Add a contact manually
- Open Contacts from the left menu.
- Click Create contact.
- Enter the email address, first name, and last name.
- Click Create.
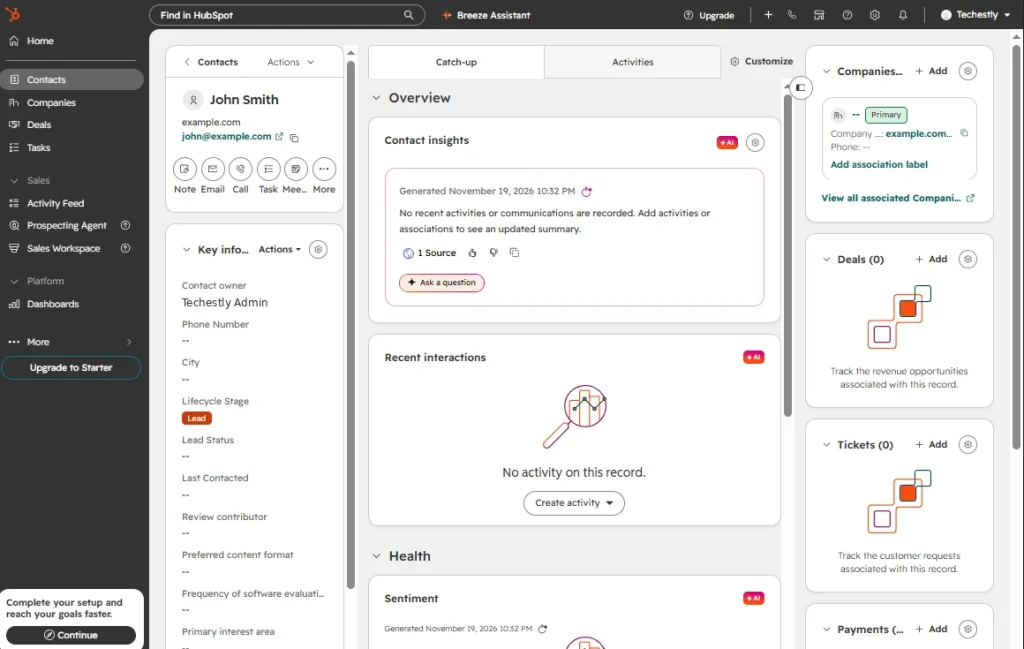
The contact record shows the custom fields from onboarding, a lifecycle stage (new contacts start as Lead), and an AI Contact insights panel. In a new account, that panel simply notes there is no activity yet. It becomes useful once emails and calls are logged.
Always fill in the email address. HubSpot uses it to spot duplicates and match incoming emails to the right contact.
Import contacts from a spreadsheet
- Clean your spreadsheet first, with one row per person and one header per column.
- Save it as CSV or XLSX.
- On the Contacts page, click Import and choose to import from a file.
- Match each column to a HubSpot property, such as Email or Phone Number.
- Review the summary and finish the import.
Import only the people you actually sell to. The free plan has a contact limit, and old contacts use it up quickly.
Step 5: Set Up Your Deal Pipeline
A pipeline is the list of stages a sale passes through, from first contact to won or lost.
If you used the onboarding assistant, HubSpot builds the pipeline for you based on your goal. For our test, it created a seven-stage pipeline: New Inquiry, Discovery Call, Needs Assessment, Proposal Sent, Negotiation, Closed Won, and Closed Lost.
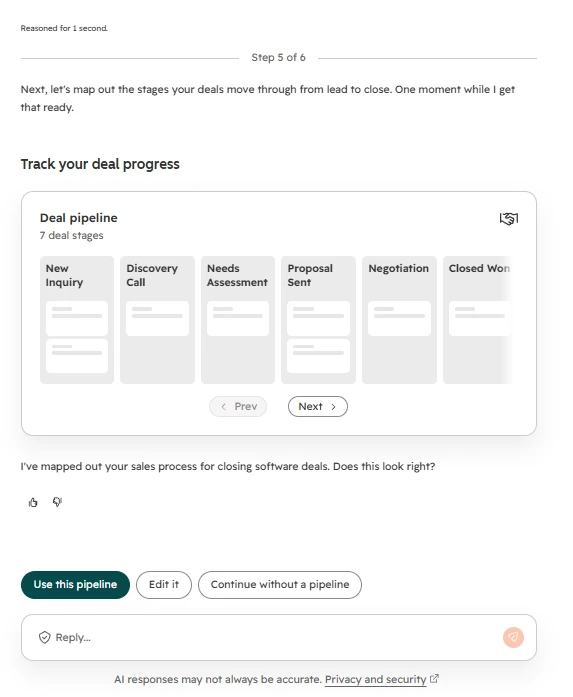
Click Use this pipeline to accept it, Edit it to change the stages, or Continue without a pipeline to use HubSpot’s default one.
Edit the pipeline later
- Click the Settings gear icon.
- Under Data Management, click Objects, then Deals.
- Open the Pipelines tab.
- Rename stages, add new ones with + Add stage, or drag them into a new order.
- Set each stage’s win probability, then save.
Keep both a Closed Won and a Closed Lost stage. HubSpot’s reports need them to count your deals correctly.
The free plan includes one deal pipeline, so shape it around your main sales process.
Step 6: Create Your First Deal
- Open a contact record and click + Add in the Deals card on the right. You can also click Add deals on the Deals page.
- Enter a deal name, such as “Website Redesign for Acme”.
- Choose the deal stage, amount, and expected close date.
- Click Create.
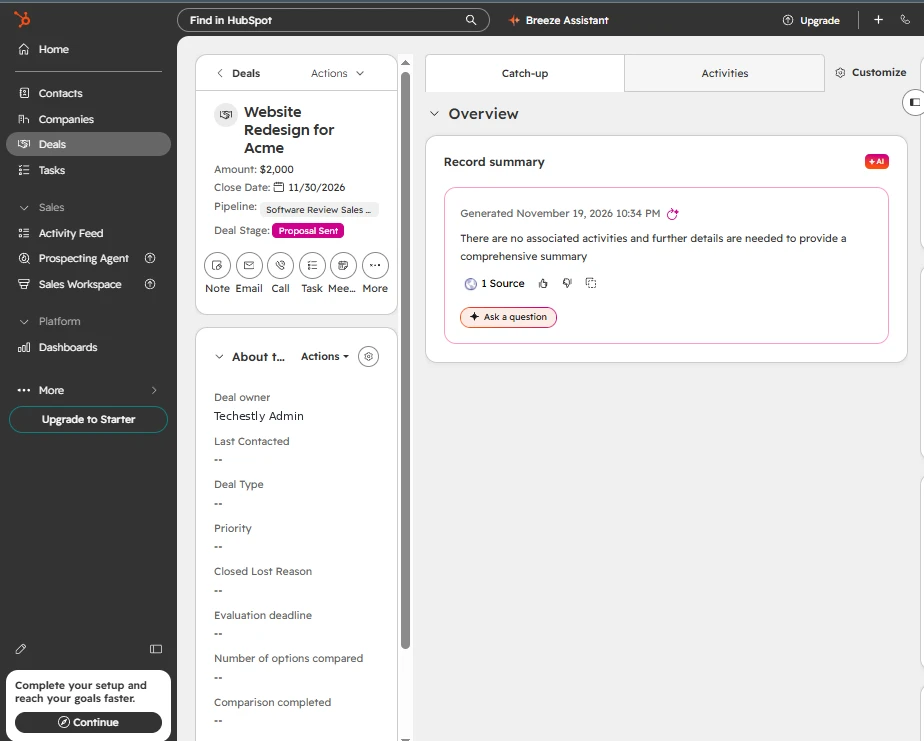
The deal record shows the amount, close date, pipeline, and stage at the top, plus an AI Record summary. The custom deal fields from onboarding, such as “Evaluation deadline”, appear in the left panel.
Open Deals in the left menu to see the deal as a card on your pipeline board. Drag the card to the next column as the sale moves forward.
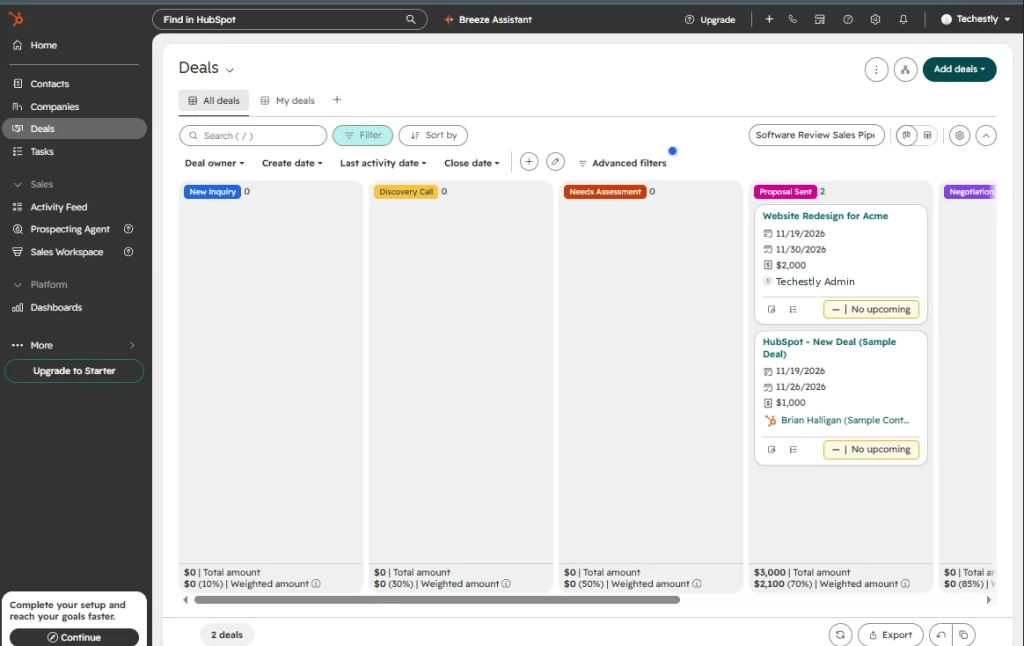
Each column shows the total deal value and a weighted amount based on the stage’s win probability. In our test, the Proposal Sent stage was weighted at 70%, so $3,000 in deals showed as $2,100. This gives a quick forecast of likely revenue.
HubSpot also adds a sample deal and a sample contact to new accounts. Delete them once you have added your own data, so they do not distort your reports.
Add a follow-up task
Open the deal, click Task, give it a title such as “Send proposal”, set a due date, and save. Make it a habit that every open deal has one next task with a date. Our test deal card showed “No upcoming”, which is exactly what this habit prevents.
Step 7: Invite a Teammate
- Click the Settings gear icon.
- Open Users & Teams under Account Management.
- Click Add users and enter your teammate’s email address.
- Choose their permissions, then send the invite.
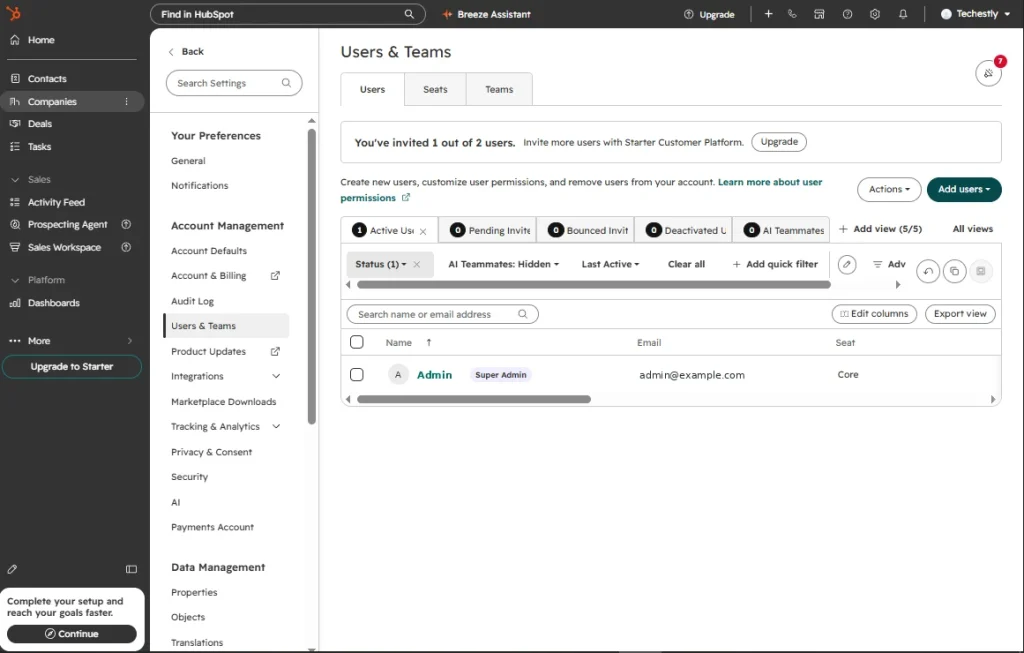
Our account confirmed the free plan’s user limit at the top of the page: “You’ve invited 1 out of 2 users.” Inviting a third person requires a paid plan.
Give teammates only the access they need. Someone who logs calls and updates deals does not need permission to change account settings.
HubSpot also has mobile apps for iOS and Android, so you can look up contacts and update deals away from your desk.
Common Mistakes to Avoid
- Skipping the onboarding assistant. It sets up fields, stages, and a dashboard that take much longer to build by hand.
- Accepting every suggested field. The free plan limits custom properties, so keep only the fields you will fill in.
- Importing a messy spreadsheet. Duplicates and empty rows are harder to fix inside the CRM.
- Leaving the sample deal and contact in place. They inflate your pipeline totals.
- Creating deals without a next task. A deal with no follow-up date is the one you forget.
- Connecting a personal inbox to a test account. Your real emails will be logged in the CRM.
Free Plan Limits to Know
HubSpot’s free CRM has no time limit, but it caps usage. At the time of writing, these are the limits a small business is most likely to reach:
| Limit | Free allowance |
|---|---|
| Users | 2 (confirmed in our test account) |
| Contacts | 1,000 |
| Deal pipelines | 1 |
| Custom properties | 10 |
| Marketing emails | 2,000 per month |
| Branding | HubSpot branding on forms, emails, and live chat |
Older guides often say the free CRM has unlimited users and one million contacts. Those figures applied to older accounts. Check HubSpot’s pricing page for current limits before you plan around them.
The next tier is Starter, priced per seat per month. Most small teams upgrade when they need a third user, more contacts, or want to remove HubSpot branding.
Frequently Asked Questions
Is HubSpot CRM really free?
Yes. The free CRM has no time limit and needs no credit card. It limits users, contacts, and pipelines, and adds HubSpot branding to customer-facing tools.
How long does it take to set up HubSpot CRM?
The AI onboarding assistant takes about three minutes. A complete basic setup, including your first contacts and deals, takes under an hour. A large or messy contact list takes longer to clean than to import.
What is the HubSpot onboarding assistant?
It is an AI setup guide that appears after sign-up. It asks about your business and goal, then suggests custom fields, a deal pipeline, and a reporting dashboard you can accept or edit.
How many users does the free plan allow?
Two. Our test account showed “You’ve invited 1 out of 2 users” in Users & Teams. Adding more users requires a paid plan.
Can I import contacts from Excel or Google Sheets?
Yes. Save the sheet as CSV or XLSX and use the import tool on the Contacts page.
Can I create more than one pipeline for free?
No. The free plan includes one deal pipeline. You can rename, add, and reorder its stages.
Does HubSpot’s free CRM work with Gmail and Outlook?
Yes. You can connect either during onboarding or later from Settings, so your emails are saved on contact records.
Final Thoughts
In our test, HubSpot’s AI onboarding assistant made the setup much faster than we expected. It suggested sensible fields and a realistic seven-stage pipeline for our business in about three minutes.
A useful HubSpot setup still comes down to four habits: clean contacts, a connected inbox, a pipeline that matches how you sell, and a next task on every open deal.
The main drawback is the two-user limit, which small teams will reach quickly. The free plan also includes only one pipeline and a small number of custom properties.
Start with the free plan and watch which limit you hit first. That tells you whether an upgrade is worth paying for, or whether another CRM would suit you better. Our guide on how to choose business software for a small business explains what to check before you commit.
Sources
- Hands-on test of a free HubSpot account, November 19, 2026
- HubSpot Knowledge Base: Set up your HubSpot account
- HubSpot Knowledge Base: Set up and manage object pipelines
- HubSpot Pricing
Last reviewed: November 19, 2026. Features, prices, and limits can change, so check HubSpot’s current documentation before making a decision.

Other Articles
How to Set Up a Trello Board for a Small Team: 7 Easy Steps
How to Create an Invoice in Zoho Invoice: 7 Simple Steps (2026)