

Trello helps a small team organize projects, assign tasks, and see what everyone is working on. Instead of tracking work through scattered messages and spreadsheets, you keep every task on one shared board.
We tested this setup on a new Trello account. Building a working board with lists, cards, a checklist, a due date, and a label took us about 15 minutes.
This guide explains how to create your account, build a board, organize tasks into lists, add card details, move work forward, and invite teammates.
Trello’s Free plan is enough for many small teams getting started. It includes unlimited cards, up to 10 open boards per Workspace, and up to 10 collaborators per Workspace, with some limits on attachments and automation that we cover later.
If you are comparing tools first, see our guide to the best free project management tools for small teams, or read our ClickUp vs Trello free plan comparison.
How we tested: We created a free Trello account on November 19, 2026, built a “Website Project” board, added cards with a label, due date, description, and checklist, and moved a card between lists. All screenshots come from that test account, with personal details removed. Trello updates its interface often, so some labels may look different in your account.
What You Need Before You Start
- A free Trello account
- A name for your team or Workspace
- A project or workflow to organize
- The email addresses of teammates you want to invite
- A rough list of tasks and who should own each one
You do not need a detailed project plan. A short list of tasks and deadlines is enough to build your first board.
Step 1: Create a Free Trello Account
- Go to the Trello website.
- Click Get Trello for free.
- Sign up with your email address, or with a Google, Microsoft, Apple, or Slack account.
- Verify your email address if Trello asks you to.
After sign-up, Trello asks what you would like to accomplish. You can describe a goal, such as “launch a website”, and Trello will create a personalized board for you. You can also pick a starting idea like Organize my to-dos or Reach a goal.
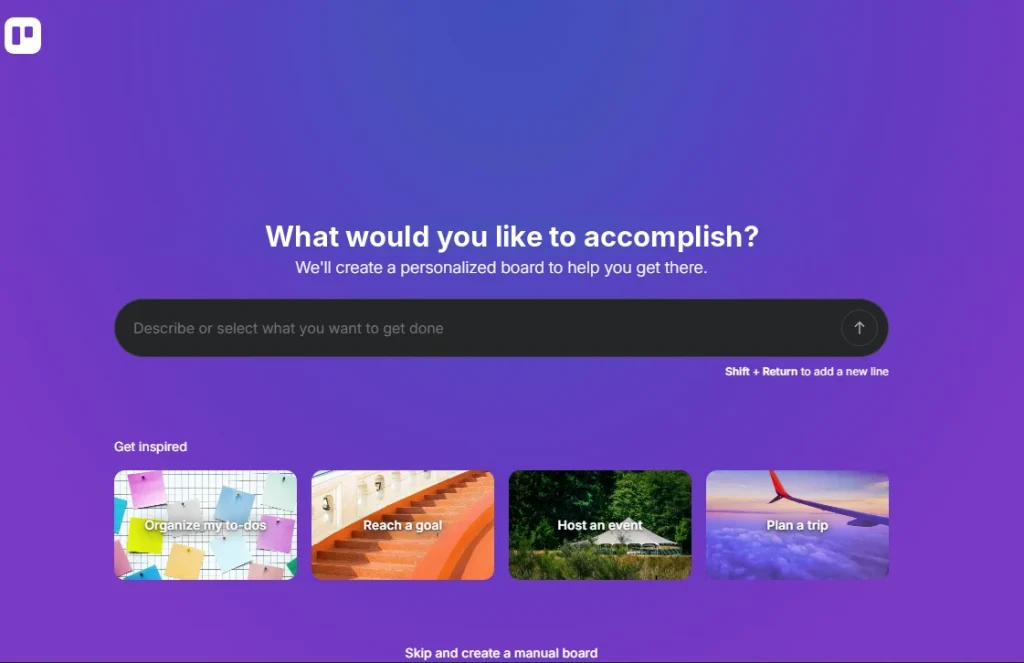
For this guide, we clicked Skip and create a manual board at the bottom of the screen, so we could build the board step by step.
What you see after sign-up
Trello opened a starter board called “My Trello board” with a Trello Starter Guide list and two lists named Today and This Week. On the left is the new Inbox, where you can capture tasks from email, Slack, or your phone. At the bottom, a menu switches between Inbox, Planner, and Board.
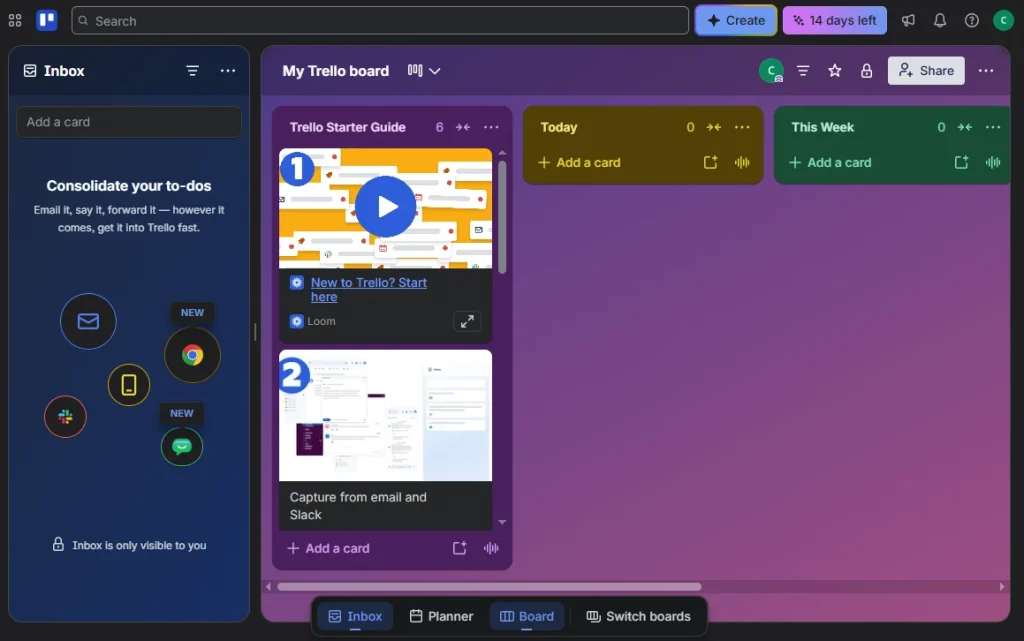
Our new account also showed a 14 days left badge at the top. This is a free trial of Trello’s paid features. When it ends, your Workspace returns to the Free plan, and your boards and cards stay in place.
Step 2: Create a Workspace for Your Team
A Workspace groups related boards. A small agency might use one Workspace for its team, with separate boards for content, client projects, and internal tasks.
Trello creates a Workspace for you during sign-up. To create another one:
- Click Create in the top bar.
- Select Create Workspace.
- Enter a name, such as “Marketing Team”, and choose a Workspace type.
- Complete the setup.
For a small team, one Workspace is usually enough. Keep in mind that the Free plan’s 10-collaborator limit applies to the whole Workspace, not to each board.
Step 3: Set Up Your First Board
A board holds your project. Each board contains lists, and each list contains cards for individual tasks.
To create a new board, click Create, select Create board, enter a name, choose your Workspace and visibility, and click Create.
To reuse the starter board instead, as we did:
- Click the board name at the top (“My Trello board”) and rename it. We called ours Website Project.
- Open the … menu on each starter list and choose Archive this list to clear the board.
Choose the right board visibility
- Private: Only board members can see the board.
- Workspace: Everyone in the Workspace can see it.
- Public: Anyone with the link can see it.
For business work, choose Private or Workspace. Never make a board public if it contains customer details or internal discussions.
Step 4: Create Lists for Your Workflow
Lists divide your board into stages. As work progresses, your team moves cards from one list to the next.
- Click + Add another list on the right side of the board.
- Type the list name and press Enter.
- Repeat for each stage.
We started with three lists, To Do, In Progress, and Done, and added one card to each.
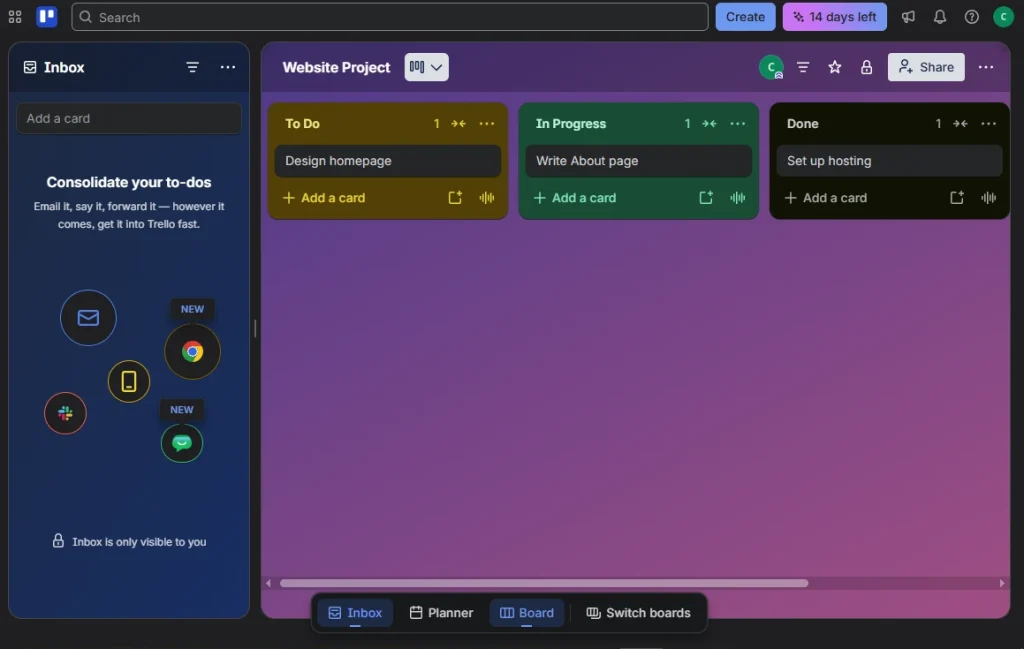
Three lists are enough for most small teams to begin with. If you need more stages, these five work well:
| List | Purpose |
|---|---|
| Backlog | Ideas and tasks not scheduled yet |
| To Do | Tasks ready to start |
| In Progress | Work being done now |
| Review | Tasks waiting for approval or feedback |
| Done | Completed tasks |
Drag lists to change their order, and click a list title to rename it.
Step 5: Add Details to Your Cards
Each card is one task. Click + Add a card at the bottom of a list, type a short task name, and press Enter. Then click the card to open it and add details.
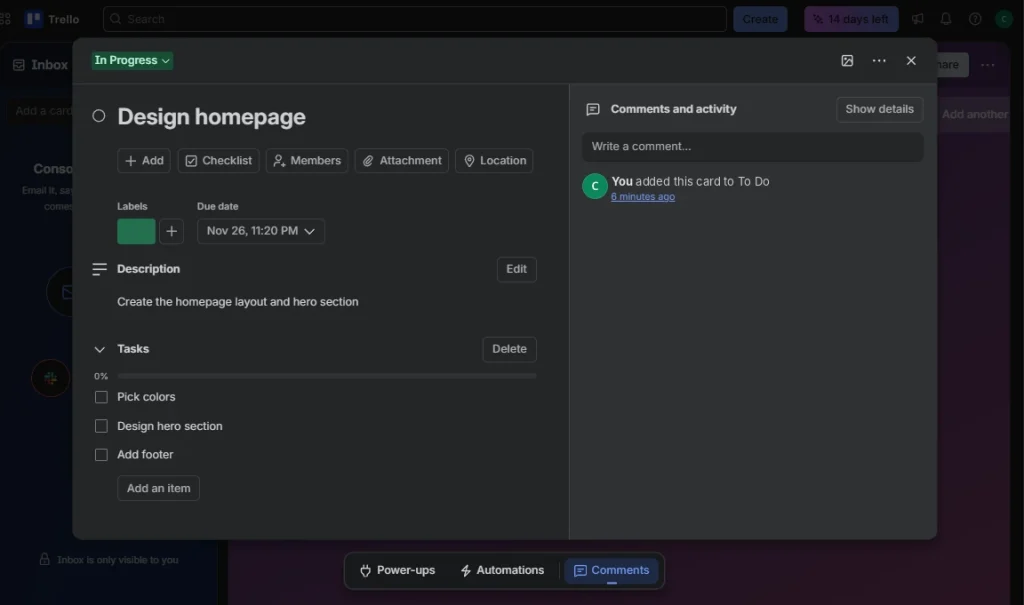
For our “Design homepage” card, we added:
- Description: “Create the homepage layout and hero section”
- Label: a green label to mark it as design work
- Due date: a date one week away
- Checklist: named “Tasks”, with three items: Pick colors, Design hero section, and Add footer
Add a checklist
- Open the card and click Checklist.
- Name the checklist and click Add.
- Use Add an item for each step.
Team members tick items off as they finish them, and a progress bar shows how much is done.
In our test, Trello pre-filled the first checklist item with one of its own onboarding tips. Check your new checklist and delete any item you did not add yourself.
Add a due date
Open the card, click the Due date field (or Add → Dates if it is not shown), pick a date and time, set a reminder, and save.
Use labels
Open the card and click the + next to Labels. Pick a color and give it a name such as Design, Content, or Urgent. Use a small set of labels that the whole team agrees on.
Once you close the card, the details appear on its front: the label color, the due date, a description icon, and the checklist count.
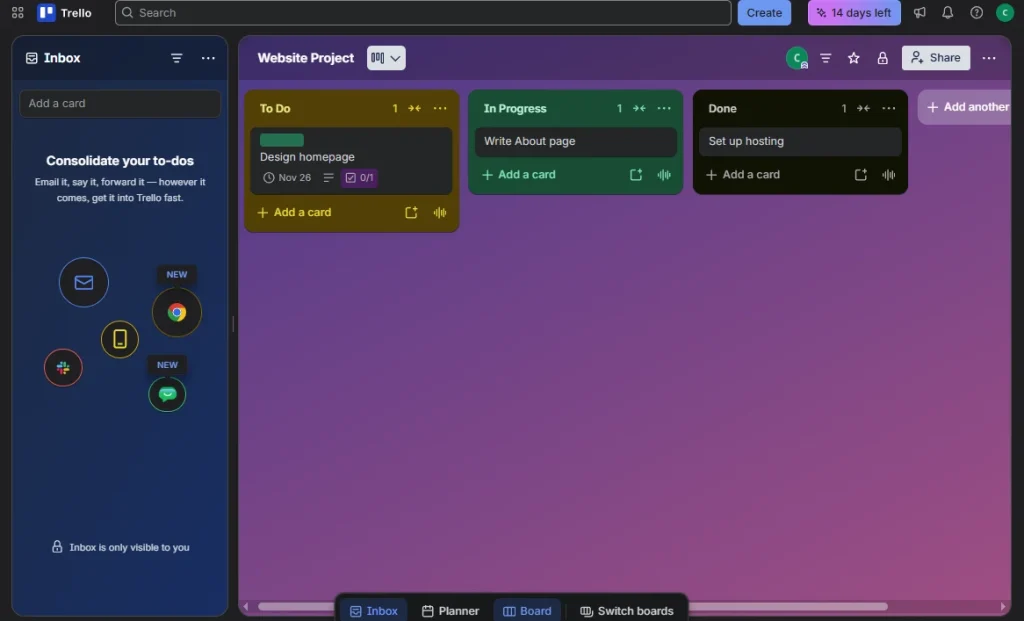
This lets everyone scan the board and spot deadlines and progress without opening each card.
Step 6: Move Cards as Work Progresses
When someone starts or finishes a task, they drag its card to the next list. We dragged “Design homepage” from To Do to In Progress.
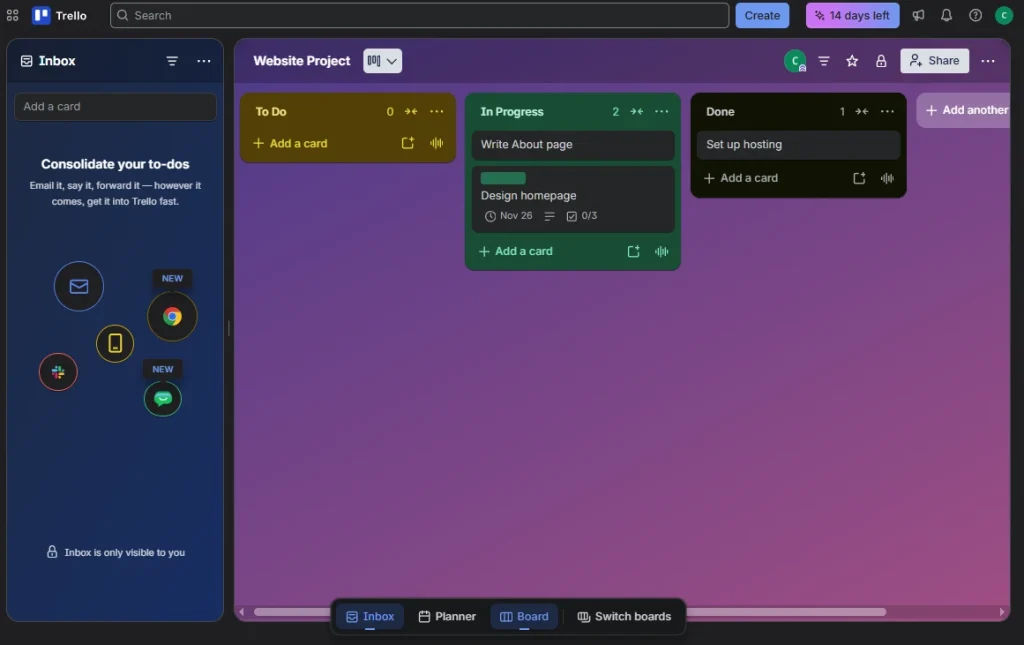
The card keeps all its details when it moves, and the list headers update their card counts. Trello also records the move in the card’s activity, so the team has a history of every change.
You can also open a card and click the list name at the top (it showed To Do, then In Progress) to move it from a menu.
Step 7: Invite Teammates and Assign Tasks
- Open the board and click Share in the top-right corner.
- Enter your teammate’s name or email address.
- Choose their permission level and send the invite.
People without a Trello account receive an email asking them to sign up.
To assign a task, open the card, click Members, and select the teammate. They will see the task and get notifications about it.
Give every active task one clear owner. Remember that everyone invited to a board, including pending invites, counts toward the Free plan’s 10-collaborator limit.
Agree on a few simple rules
- Every card has a clear title, such as “Write homepage introduction” rather than “Website work”.
- Every active card has an owner and, if needed, a due date.
- Updates go in card comments, not in scattered chat messages.
- Cards move as soon as their status changes.
Use Trello on your phone
Trello has apps for iOS and Android, so your team can check cards, add comments, and get notifications away from their desks.
Common Trello Setup Mistakes to Avoid
- Creating too many lists. Start with three to five clear stages.
- Using vague card names. Make each card describe a specific task.
- Leaving tasks unassigned. Every active card needs an owner.
- Keeping starter content. Archive the Trello Starter Guide list and check new checklists for pre-filled tips.
- Creating too many labels. A few shared labels are easier to understand.
- Making business boards public. Keep internal work Private or limited to your Workspace.
- Inviting unnecessary people. All invites count toward the Workspace limit.
- Not updating the board. A board is only useful when cards reflect what is really happening.
Trello Free Plan Limits to Know
| Feature | Free plan allowance |
|---|---|
| Open boards | Up to 10 per Workspace |
| Collaborators | Up to 10 per Workspace |
| Cards | Unlimited |
| Power-Ups | Unlimited per board |
| Attachment size | 10 MB per file |
| Automation runs | 250 per month per Workspace |
| Mobile apps | iOS and Android |
The collaborator limit covers the whole Workspace. It includes Workspace members, board guests, and pending invitations. If a free Workspace goes over 10 collaborators, its boards become view-only and automations stop running until you remove people or upgrade.
If your team shares large design files or videos, the 10 MB attachment limit may be a problem. You can link to files stored in Google Drive or Dropbox instead.
Check Trello’s pricing page for the latest plan details before you decide.
Frequently Asked Questions
Is Trello free for small teams?
Yes. The Free plan includes unlimited cards, up to 10 open boards, and up to 10 collaborators per Workspace. Attachments and automation have limits.
What does “14 days left” mean in a new Trello account?
It is a free trial of Trello’s paid features. When the trial ends, the Workspace returns to the Free plan unless you choose to upgrade. Your boards and cards are kept.
Can Trello create a board for me?
Yes. After sign-up, you can describe what you want to accomplish, and Trello will create a personalized board. You can also skip this and build the board yourself.
How many people can use Trello for free?
Up to 10 collaborators per Workspace, including members, guests, and pending invites.
What is the difference between a list and a card?
A list is a stage of work, such as To Do or Done. A card is an individual task inside a list.
Can I assign tasks to team members?
Yes. Once someone is a member of the board, open a card, click Members, and add them.
Does Trello have a mobile app?
Yes. Trello has apps for iOS and Android.
Final Thoughts
In our test, Trello was quick to learn. Building a board with three lists and adding a fully detailed card took about 15 minutes, and moving cards between lists felt natural from the start.
The new Inbox and Planner views add useful ways to capture and schedule tasks, but they also make the first screen busier than older versions of Trello. We recommend archiving the starter content right away so your team sees only your project.
Start with one board, three to five lists, and clear card owners. If your team grows past 10 people or needs more automation, compare Trello’s paid plans with other tools.
If you are still deciding which software fits your business, read our guide on how to choose business software for a small business.
Sources
- Hands-on test of a free Trello account, November 19, 2026
- Trello Pricing
- Trello Support: Add and customize cards and lists
- Trello Support: Add, delete, and manage checklists
- Trello Support: Add due dates and start dates to cards
- Trello Support: Collaborator limit for free Workspaces
Last reviewed: November 19, 2026. Features, prices, and limits can change, so check Trello’s current documentation before making a decision.

Other Articles

How to Send Your First Email Campaign in Mailchimp (7 Easy Steps)
How to Set Up HubSpot Free CRM for a Small Business (7 Steps)