

Sending your first email campaign can feel confusing when you are new to email marketing. You need a contact list, a sender address, a subject line, and a finished email, and Mailchimp will not let you send until all of them are ready.
We tested the whole process on a new Mailchimp Free account. Mailchimp’s five-item email checklist made it easy to see what was missing, and it caught two problems we would have missed on our own.
This guide covers a regular email campaign, which sends one message to all your subscribed contacts at once.
How we tested: We created a free Mailchimp account on November 20, 2026, added a test contact, and built a welcome email until Mailchimp’s checklist showed 5/5 items complete. We did not send the campaign to real subscribers. All screenshots come from that test account, with personal details removed. Mailchimp updates its interface often, so some labels may differ in your account.
What You Need Before You Start
- A Mailchimp account
- A list of people who have agreed to receive your marketing emails
- A business email address, ideally on your own domain (such as hello@yourbusiness.com)
- Your subject line, message, and any links you want to include
- A mailing address for your email footer, which email laws require
Do not upload purchased, scraped, or random email lists. Mailchimp can restrict accounts that email people without permission.
Mailchimp Free Plan Limits in 2026
According to Mailchimp’s pricing page, the Free plan includes:
| Feature | Free plan |
|---|---|
| Monthly price | $0 |
| Contacts | Up to 250 |
| Email sends | 500 per month |
| Daily email sends | 250 |
| Audiences | 1 |
| User seats | 1 |
| Email templates | Basic templates only (we saw many marked “Paid”) |
| Email scheduling | Not included |
| Mailchimp referral badge | Required in every email (confirmed in our test) |
Your 500 monthly sends are not the same as 500 subscribers. Sending one campaign to 200 people uses 200 sends, and a second campaign to the same people uses another 200. Test emails count too.
If you go over the 250-contact limit, Mailchimp can pause sending until you remove contacts or upgrade. Check Mailchimp’s pricing page for current limits before you decide.
Step 1: Create Your Free Mailchimp Account
- Go to Mailchimp’s website and click Sign Up Free.
- Enter your email address, a username, and a password.
- On the Tell us a bit about you screen, enter your name, business name, and website.
- Click Next and choose the Free plan when asked.
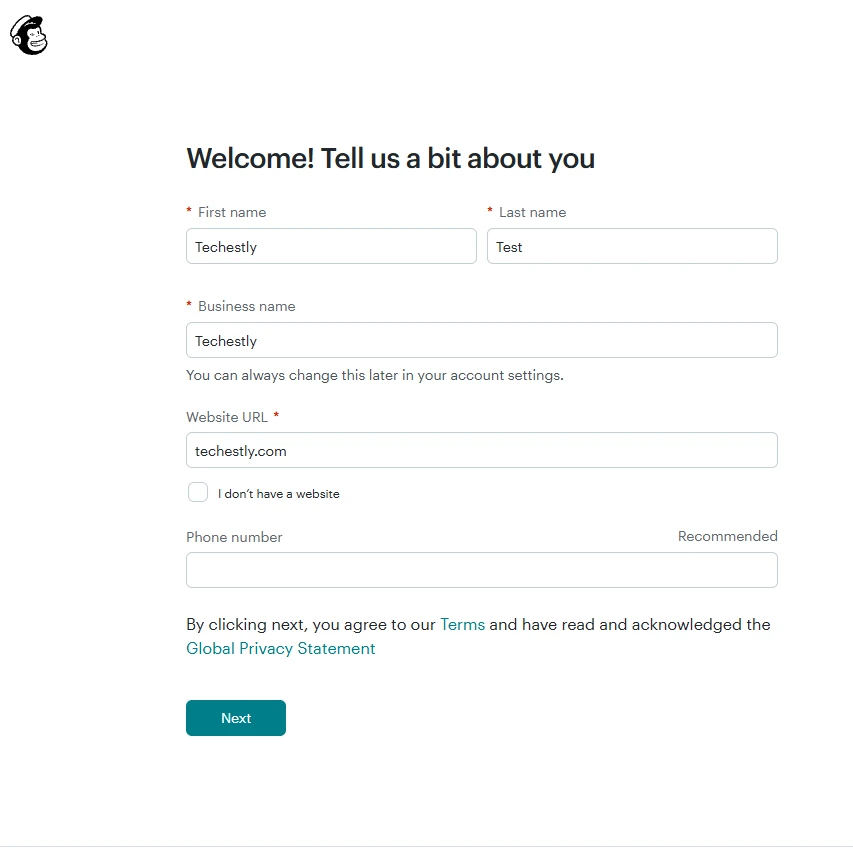
The phone number field is optional. Mailchimp also asks for a mailing address during setup. This address appears in the footer of every email you send, so use a business address or PO box rather than your home address.
Next, Mailchimp asks what you want to do first, with options such as Grow my list, Send an email today, and Just exploring. It uses your answer to tailor the dashboard.
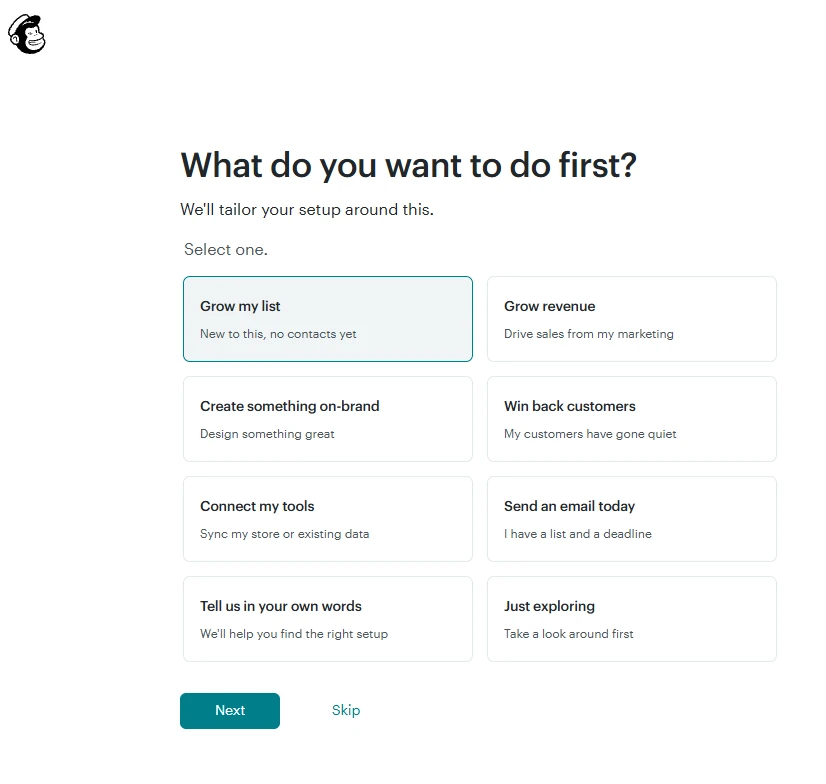
We chose Send an email today, since this guide focuses on sending a campaign.
Step 2: Get to Know the Dashboard
After setup, Mailchimp opens the Home page. The left menu holds Campaigns, Automations, Forms, Audience, and Analytics, and a Create email button sits in the top-right corner.
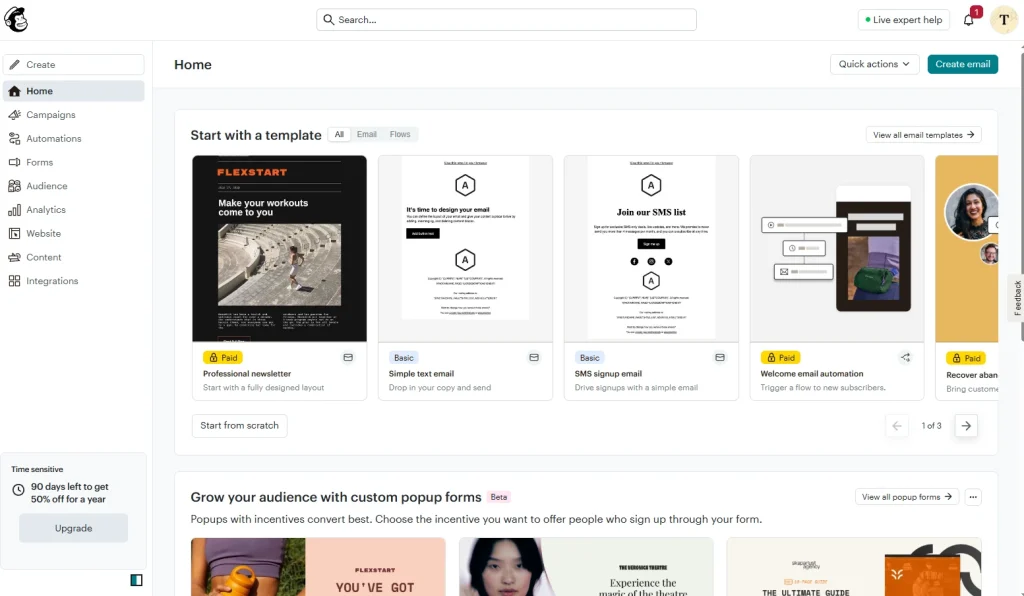
The Start with a template section is worth a closer look. In our Free account, several templates, such as “Professional newsletter” and “Welcome email automation”, carried a yellow Paid label. Only the templates marked Basic, such as “Simple text email”, were available for free.
Our dashboard also showed a “Time sensitive” upgrade offer in the sidebar. You can ignore it while you learn.
Step 3: Add Contacts to Your Audience
Your audience is the list of people you email. The Free plan includes one audience.
- Open Audience in the left menu.
- Click Add contacts, then choose to add a single contact.
- Enter the first name, last name, and email address.
- Tick This person gave me permission to email them.
- Click Add contact.
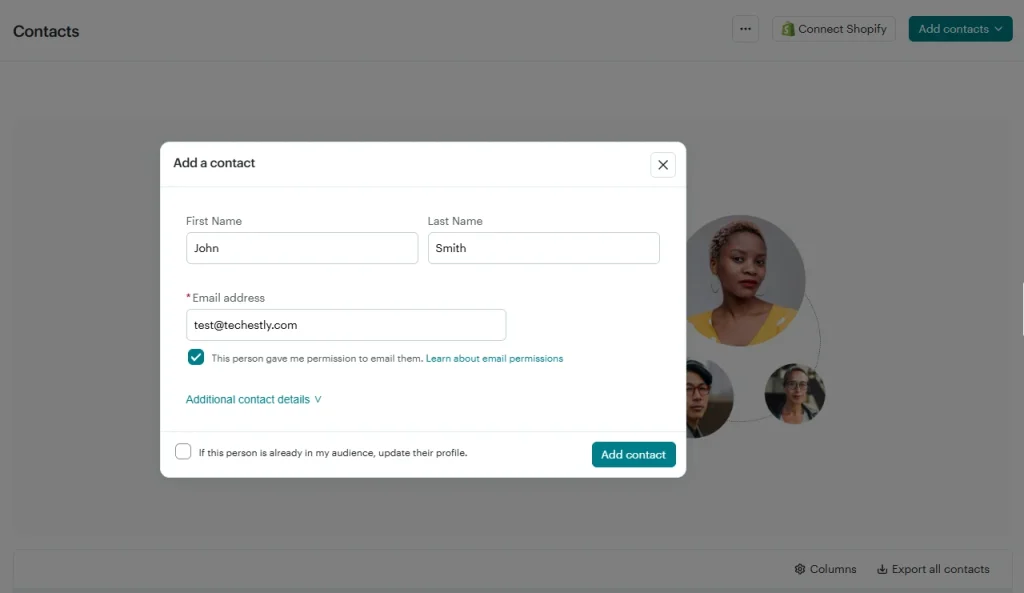
The permission checkbox is not a formality. Mailchimp expects every contact to have opted in, and emailing people without permission can get your account suspended.
To add many people at once, choose Import contacts instead and upload a CSV file. Make sure it contains only people who agreed to hear from you.
If you need a separate tool to manage customers and sales, see our guide to the best free CRM software for small businesses.
Step 4: Create Your Email and Check the Sender
- Click Create email on the Home page.
- Give the email a name so you can find it later. Subscribers do not see this name.
- Mailchimp opens a checklist with five sections: To, From, Subject, Send time, and Content.
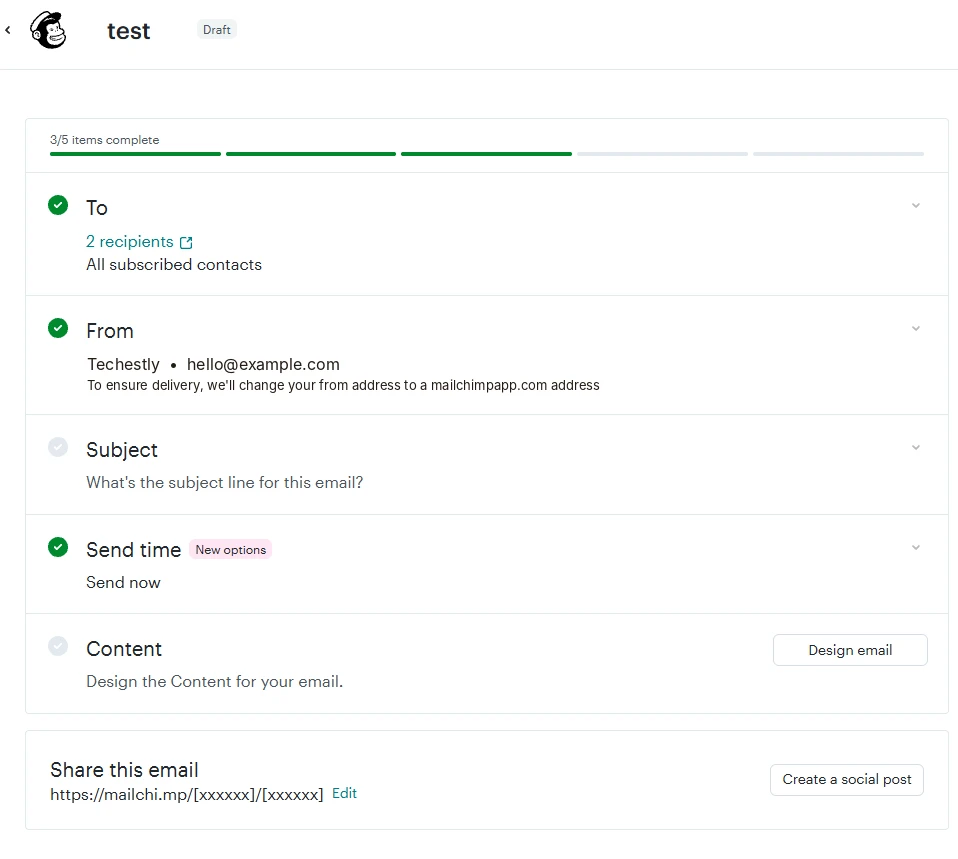
Mailchimp filled in three sections for us automatically. To was set to all subscribed contacts, From used our account name and email, and Send time was set to Send now.
Why your sender address matters
Our test account used a free Gmail address. Mailchimp showed a note under From saying it would change our sender address to a mailchimpapp.com address “to ensure delivery”.
This happens because free email providers such as Gmail block other services from sending mail in their name. Recipients would see an unfamiliar address, which looks less trustworthy.
To avoid this, use an email address on your own domain, such as hello@yourbusiness.com. Then verify and authenticate the domain:
- Click your profile icon and open Account & billing.
- Select Domains, then Add & Verify Domain.
- Enter an address on your domain and click Send Verification Email.
- Confirm the verification email.
- Add the DNS records Mailchimp shows you at your domain provider.
Use the records shown in your own Mailchimp account, not ones copied from another website.
Add a subject line
Open Subject and enter your subject line. We used “Welcome to the Techestly newsletter”. Mailchimp allows up to 150 characters but recommends keeping it to about 60.
You can also add preview text, which appears next to the subject line in many inboxes. Use it to add context, not to repeat the subject.
Step 5: Design Your Email
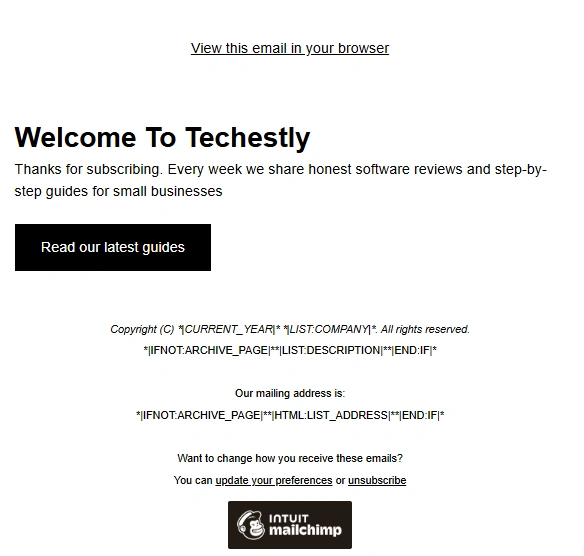
Click Design email in the Content section and pick a template. We chose Simple text email, one of the free Basic templates.
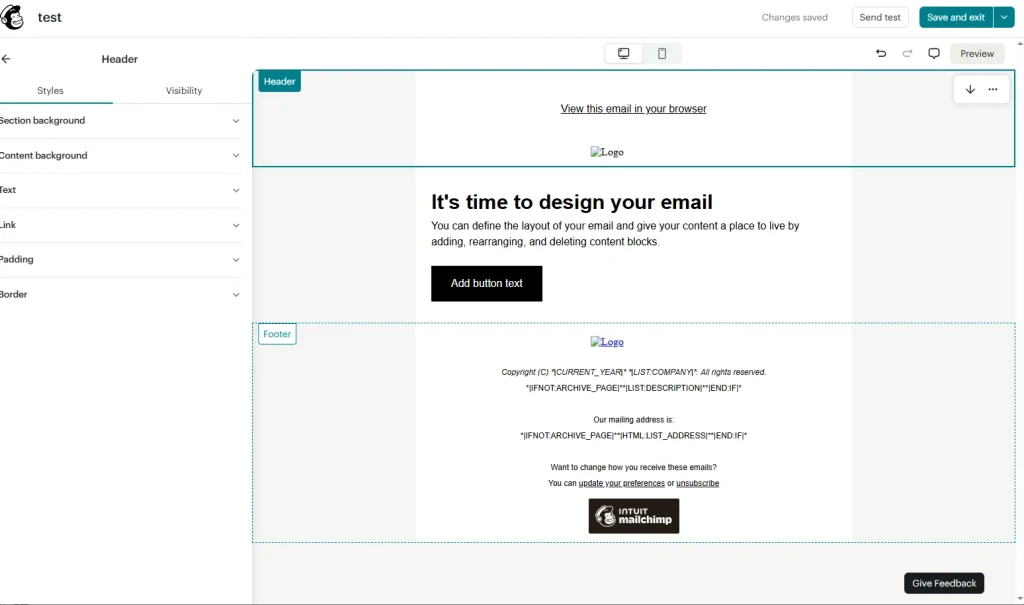
The editor shows your email in the middle and style options on the left. Click any block to edit it. The template includes:
- A header with a “View this email in your browser” link and a logo placeholder
- A heading, a paragraph, and a button, all filled with placeholder text
- A footer with copyright, your mailing address, unsubscribe links, and the Intuit Mailchimp badge
The footer text looks strange in the editor, with codes like *|LIST:COMPANY|*. These are merge tags. Mailchimp replaces them with your real business name and address when the email is sent, so leave them in place.
To finish the design:
- Click the heading and replace it with your own.
- Replace the paragraph with your message.
- Click the button, change its text, and add your link.
- Upload your logo, or delete the logo block if you do not have one.
- Click Save and exit.
Keep it simple: one heading, a short message, and one clear button.
Step 6: Fix What the Checklist Flags
Back on the checklist, Mailchimp reviews your content before letting you send. Our first attempt failed.
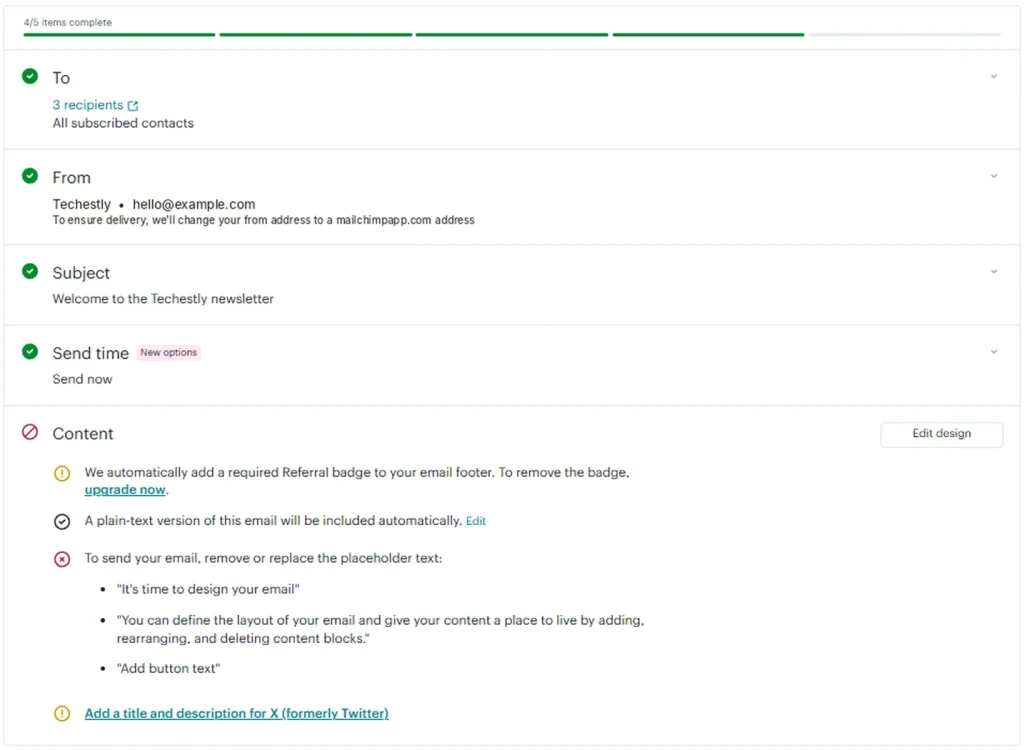
Two things stood out:
- Placeholder text blocks sending. We had saved the template without replacing all its sample text. Mailchimp listed each placeholder (“It’s time to design your email”, “Add button text”, and so on) and marked Content with a red icon. The email cannot be sent until every placeholder is replaced.
- The referral badge is required. A yellow notice said Mailchimp automatically adds a referral badge to the footer, and that removing it requires an upgrade.
We went back to Edit design, replaced the placeholder heading, paragraph, and button text, and saved again. The checklist then showed 5/5 items complete.
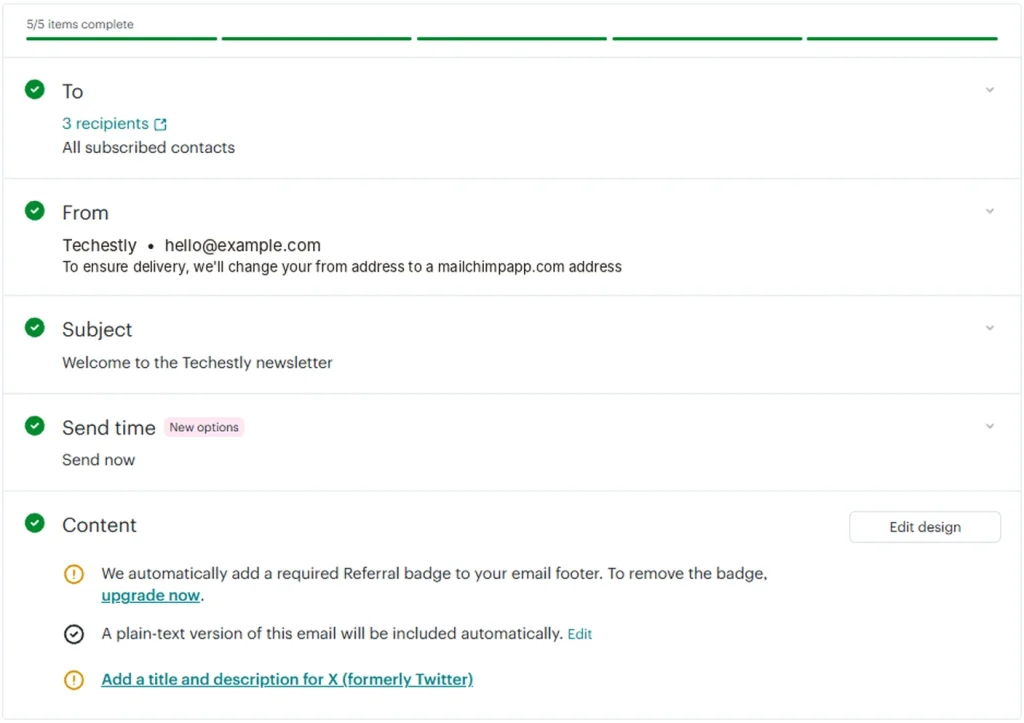
Here is the finished email in the editor:
Send a test email first
Before sending to your audience, click Send a Test Email on the checklist page, enter your own address, and check the email in your inbox. Review:
- The sender name and address
- The subject line and preview text
- How the email looks on mobile and desktop
- Spelling and grammar
- Every button and link
- The footer, unsubscribe link, and mailing address
Test emails count toward your monthly sending limit, so send only one or two.
Step 7: Send Your Campaign
When the checklist shows 5/5 and your test email looks right:
- Confirm Send time is set to Send now. The Free plan does not include scheduling.
- Check the recipient count under To one last time.
- Click Send in the top-right corner.
- Read the confirmation popup and click Send now.
Once a regular email is sent, you cannot edit or stop it. In our test, we stopped at this point, since our audience contained only test contacts.
Check your results
After sending, open Campaigns, find your email, and view its report. The most useful numbers are:
| Metric | What it tells you |
|---|---|
| Emails sent | How many messages Mailchimp delivered |
| Opens | How many tracked opens were recorded |
| Clicks | How many tracked link clicks were recorded |
| Bounces | How many messages could not be delivered |
| Unsubscribes | How many recipients opted out |
Focus on clicks, bounces, and unsubscribes. Open counts are less reliable, because email privacy features can affect them.
Common Mistakes to Avoid
- Emailing people without permission. Only email contacts who opted in.
- Using a free Gmail or Yahoo address as the sender. Mailchimp will replace it with a mailchimpapp.com address.
- Using your home address in the footer. It appears in every email you send.
- Leaving template placeholder text. Mailchimp will block sending until you replace it.
- Picking a Paid template on the Free plan. Look for the Basic label.
- Skipping the test email. Always check the email in a real inbox first.
- Ignoring your send limit. Test emails and repeat campaigns all count toward the 500 monthly sends.
Frequently Asked Questions
Can I send email campaigns with Mailchimp for free?
Yes. The Free plan includes up to 250 contacts and 500 email sends per month, with a daily limit of 250. It includes one audience and one user.
Can I remove the Mailchimp badge on the Free plan?
No. Mailchimp adds a required referral badge to every email on the Free plan. Our test account showed a notice saying the badge can only be removed by upgrading.
Why did Mailchimp change my sender address?
If you send from a free address like Gmail, Mailchimp replaces it with a mailchimpapp.com address to improve delivery. Use and verify an email address on your own domain to keep your own sender address.
Why can’t I send my Mailchimp email?
The most common reason is unfinished template text. Mailchimp blocks sending while placeholder text, such as “It’s time to design your email”, remains. The Content section of the checklist lists exactly which text to replace.
Can I schedule an email on the Free plan?
No. Scheduling is included with the Essentials plan or higher. Free users can only send immediately.
Are all Mailchimp templates free?
No. In our Free account, many templates were labeled Paid. Templates labeled Basic, such as Simple text email, are free to use.
Final Thoughts
In our test, Mailchimp’s five-item checklist was the most helpful part of the process. It filled in our recipients, sender, and send time automatically, and it refused to send until we had replaced every piece of placeholder text.
The Free plan works well for learning email marketing and for small lists. The trade-offs are clear: a 250-contact limit, 500 sends per month, no scheduling, a required Mailchimp badge, and a limited set of free templates.
Start with a small, permission-based audience, use a business email address on your own domain, and send yourself a test before every campaign. If you outgrow the Free plan, compare it with other tools in our guide to the best free Mailchimp alternatives, or read Mailchimp vs Brevo Free Plan.
For help choosing the right tools for your business, see our guide on how to choose business software for a small business.
Sources
- Hands-on test of a free Mailchimp account, November 20, 2026
- Mailchimp Pricing
- Mailchimp Help: Create a Regular Email
- Mailchimp Help: Verify an Email Domain
- Mailchimp Help: Limitations of Free Email Addresses
- Mailchimp Help: Import & Manage Contacts
- Mailchimp Help: Preview and Test Your Email
- Mailchimp Help: About Email Footers
- Mailchimp Help: Add or Remove Referral Badges
- Mailchimp Help: Email Reports
Last reviewed: November 20, 2026. Features, prices, and limits can change, so check Mailchimp’s current documentation before making a decision.

Other Articles
How to Set Up a Trello Board for a Small Team: 7 Easy Steps